PINEAPPLE COCONUT CREAM PIE

0 komentar

I found this quick and easy pie recipe over at Sweet as Sugar Cookies the other day. Lisa hosts a Saturday blog that is FULL of great dessert recipes. If you haven't checked it out, please do so, it is lots of fun.

Lisa posted this as a pineapple cream pie, but I added half cup of coconut to the pudding and topped it with stabilized whipped cream. It was quick, easy and delicious!!!
The pudding is nearly fool proof!!

½ cup white sugar
½ teaspoon salt
3 tablespoons cornstarch
1 tablespoon all purpose flour
2½ whole milk
3 egg yolks

Put all of the above ingredients into a heavy bottomed pan and whisk it until any lumps are gone. Bring to a boil over medium heat, stirring constantly with rubber spatula.  Once the pudding starts to thicken, switch to a whisk and whisk, while it boils, for one minute (it will get very thick).

Remove from heat and stir in:
1 tablespoon butter
1 teaspoon vanilla (I used 2 teaspoons)
1 cup canned crushed pineapple (I drained it and squeezed it dry)
½ cup flaked coconut (my addition)


Pour into 9" graham cracker pie shell and place plastic wrap on the surface of the hot pudding. Chill for several hours, then remove plastic and top with stabilized whipped cream.

Stabilized Whipped Cream (won't deflate)  Makes 2 cups
1 cup heavy whipping cream
¼ cup powdered sugar
1 teaspoon vanilla extract
1 teaspoon unflavored gelatin powder
4 teaspoons cold water

Put unflavored gelatin powder in a small dish and add 4 teaspoons of cold water and stir. Let this sit until it looks semi-solid, then put this in the microwave for just a couple seconds (my microwave takes about 3 or 4 seconds) and it will turn back to a liquid.  Let this liquid cool, but not so cool that it turns back into a solid.
Whip the cream, sugar and vanilla until it gets thick, but  not totally whipped.  While the beaters are still going on high, dribble in the cooled liquid gelatin. Continue beating until stiff peaks form.

NOTE: A 20 ounce can of crushed pineapple (drained and squeezed dry) gives you about 1½ cups of fruit.
NOTE: This pie slices beautifully.

EASY ZUCCHINI RELISH

0 komentar

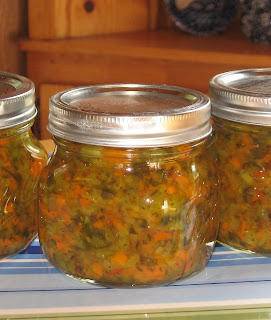
This recipe comes from a friend (Diana) who has been making this relish for 20 years. It not only tastes great, but it is an excellent way to use all of those zucchini's that friends "share" this time of year. The relish has a delicious bread and butter pickle flavor that goes well in tuna salad, potato salad, hot dogs of course, salad dressing, on top of hamburgers and a million other uses. It is MUCH better than any commercial relish we've tried.
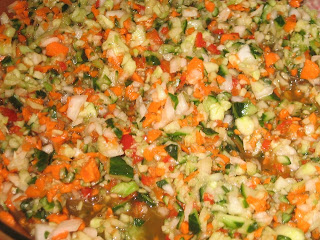
I did all my chopping in small size batches with the food processor. I rough chopped with a knife and then put 3 cups chopped veggies into the food processor and gave it 8 to 10 short pulse bumps to get the perfect dice, quick and easy!!

10 cups chopped zucchini  (medium fine chop...maybe half the size of a pea?)
5 cups chopped onion (I used sweet Vidalia onions)
1 cup chopped celery
5 chopped sweet bell peppers (red/orange/yellow)
1 cup pickling salt (see note)

Mix the above ingredients, cover with plastic and let this sit overnight. Diane says it doesn't have to be refrigerated, but I did.

The next step is most important: RINSING off the salt!!!  I triple rinsed my chopped veggies in small batches (using a fine mesh strainer) so I could really make sure the salt was gone, then squeeze them dry and set aside.

In a large non-aluminum pot, mix:
5 cups white vinegar
2 teaspoons turmeric
1 tablespoon DRY mustard powder
3 tablespoons celery seed
6 cups sugar
3 tablespoons cornstarch

Bring this mixture to a boil and stir until the sugar is dissolved. Add the chopped veggies and bring back up to a boil.  Once it is at a boil, turn down the heat to a very low simmer and simmer for 20 minutes, stirring every few minutes. This relish might seem a little "loose" while it is still hot, but it will "tighten up" once chilled in the fridge.

Pour relish into sterilized jars, leaving about ½" head space. Wipe rim of jar with hot wet towel and put on the lids and rings.  Process in boiling water bath:  10 minutes for half pints and 15 minutes for pints.

My Picky-Picky Husband gave this a thumbs up!!

NOTE: This recipe makes ABOUT 6 pints of relish.
NOTE: Don't use regular table salt in this recipe because the anti-caking agents cause a less than desirable color change.  If you don't have pickling salt, the next best thing is Kosher salt.

Weekday Potluck #5: Calamari

0 komentar


I'm a big fan of calamari, those battered rings of squid coated in a rich batter and deep fried to a crisp. Served with rice, or on its own with a sweet-spicy vinegar dip, this simple dish is definitely a winner for both kids and adults alike. This yummy treat is from Mymy, the wonderful author of My Bric-a-Brac.

Here are the list of sponsors that you need to place at the end of your post if

Mercato Centrale: Ha Yuan's Chilled Taho

0 komentar


I'm a big fan of taho and soy milk. We used to have our own soy milk maker here at home, but it's not working anymore. Soy milk that's missing from our diet is tolerable, but to have our morning servings of hot, steaming cups of silken tofu glazed with sugar syrup and tapioca balls is something else. I wondered why our taho vendor has gone missing, turns out he was selling in the afternoons,

ITALIAN SAUSAGE

0 komentar

Oh my goodness, this sausage tastes SO good and goes together in a flash. The recipe says you can use it right away, but I let mine sit in the fridge for a few hours to blend the flavors, then fried it all up and froze it in small packages so it will be instantly ready for pizzas (or a million other things). This is going to be a regular at our house from now on!!

ITALIAN SAUSAGE
2 pounds of ground pork
1 teaspoon black pepper
1 teaspoon dry parsley
1 teaspoon Italian seasoning
½ teaspoon garlic powder
1/8 teaspoon red pepper flakes
¾ teaspoon fennel seeds
½ teaspoon paprika (not the hot kind)
½ teaspoon dry minced onion flakes
1½ teaspoon salt

Mix the spices together before you add to the meat.  A note about the fennel, onion flakes, red pepper flakes and Italian seasoning: I measured the ingredients first, THEN I ground them with my mortar and pestle so that they would distribute evenly throughout the sausage. Knead the spices into the meat with your hands and chill completely.
 
After the sausage has "mellowed" in the fridge for a few hours, or overnight, either fry (for about 10 minutes for until browned and crumbly), or package and freeze.

This was SO good, I'll NEVER buy pre-made Italian sausage again!! It is also delicious in a meat sauce


NOTE: I make my own Italian seasoning with equal parts of: dried basil, dried marjoram, dried oregano, dried thyme, dried rosemary and dried sage (measure the rosemary...THEN crush it a little before you add it to the blend.

Onion Thotakura Dosa (Amaranth Dosa)

0 komentar


This is a one pot meal dosa as it doesnt need any side dish, it contains some veggies like thotakura also known as amaranth which makes it filling.In place of amaranth leaves you can use cabbage,spinach etc.
I learnt this recipe from one of my kannada neighbours. She called it sambar dosa which surprised me.Then I asked her why she called it sambar dosa she said all the ingredients we use in sambar is used here.It has a tangy spicy flavor.
Ingredients
  • 1 cup rice
  • 1/4 cup grated coconut
  • 4 red chilli
  • 1 tsp cummin seeds
  • 1/2 cup chopped onions
  • 1 cup chopped thotakura ( amaranth )
  • 1/2 tsp jaggery
  • lemon size tamarind
  • 1/2 tsp oil for each dosa
  • salt to taste

( Click all images for enlarged view )

Procedure
Soak rice for 4 hrs. Drain the water. In a mixe jar/blender add all the above ingredients except onions and green leaves. Make a smooth batter and keep aside
Take 1 tsp oil in fry pan and add chopped onions and fry till translucent and keep aside.
In another bowl boil 2 cups water and add this hot water, fried onion, chopped veggies to the above prepared batter and mix nicely. Check the consistentcy it should be like rawa dosa batter.
Now heat a pan and pour one cup in a circle starting from the edge of the pan and it should move inwards till the center.
Note: Adding hot water makes the dosa smooth, in place. You can use chopped cabbage, chopped spinach instead of amaranth

Pineapple Fried Rice

0 komentar


Pineapple fried rice is Thai in origin. The sweetness of the pineapple chunks combines well with the wonderful aroma and flavor of the bell peppers, and the salty taste of soy sauce. It usually has a moderate amount of heat, but since I made this one from scratch on a lazy morning, no chilis for me. It's not as colorful as the ones made with bright red chilies and red bell peppers, but I can

Weekday Potluck #4: Fish and Pie

0 komentar


This week's Weekday Potluck schedule was delayed for two reasons, one was that I was sick and couldn't put it up, and that I wanted to move it closer to the weekend, where most of us including me indulge in so much food. :)

To start the party, here are three featured participants from last week:


Fish and Chips by Jenn of I Live To Eat!

Salmon Cakes by Pattie of Olla Podrida
and Buko (Coconut

SM Master Chefs 2011: Jonathan Chua

0 komentar


SM Hypermarket has just reached its 10th anniversary, and to celebrate, well-known chefs are giving their Cooking Marathons and Demos live in many Hypermarket branches nationwide. From July to September, every week there will be cooking demos in different branches. To catch their wonderful events in your area, see the Cooking Marathon Schedule. Apart from the Cooking Marathon, they are

CHEWY SUGAR COOKIES

0 komentar

It is lunch box time again!! Can it be time for kids to go back to school already? These quick and easy sugar cookies are sweet, buttery and chewy. Frosting them definitely is not necessary, but Hubby loves them that way, so...

1 cup butter (room temperature)
1¼ cups granulated sugar
3 egg YOLKS
2 teaspoons vanilla extract
2½ cups all purpose flour
1 teaspoon baking soda
½ teaspoon cream of tartar
extra sugar to roll cookies in before baking

Cream 1 cup of butter with 1¼ cups of granulated sugar; add the egg yolks and vanilla and beat until smooth.
Add the flour, baking soda and cream of tartar, beat until smooth.

Form dough into balls (about the size of a small walnut) and roll in granulated sugar. Place on parchment lined cookie sheet (or sheet sprayed with cooking spray). DO NOT FLATTEN.

Bake at 350F for 10-11 minutes, or until tops are cracked and just starting to turn golden. Carefully remove to cooling rack.   Makes 3 dozen.
NOTE:  Due to egg yolk size differences (and therefore amount of liquid differences), if your cookie dough seems a little dry, mix in a tablespoon of water.

Half and Half Bread

0 komentar

From long time I wanted to try a whole wheat bread but suddenly I came across a very interesting book.I tried my hand on half and half bread and the result came out awesome.

This recipe is adopted from "Homebaked" by George and Celilia Scurfield. This recipe will give you two small 2 loaves. The half and half bread is little grainy in texture and tasted very good after toasting it.

Ingredients
  • 350 gms maida (all purpose flour)
  • 250 gms atta (wheat flour)
  • 8 gms dry active yeast
  • 25 gms margarine/butter at room temp
  • 1 tbsp sugar
  • 2 tbsp olive oil
  • 1 tsp salt
  • 350 ml warm water
( Click images for enlarged view )
Baking Procedure

Stage 1 - Making the dough
Take a large bowl add sugar,salt, butter and yeast and mix nicely.Then add warm water and let it sit for 10 min. After 10 min add the all purpose flour 1 cup at a time and knead for approximately 5 min or until the dough becomes smooth.Keep the dough aside.

Stage 2 - Resting the dough for baking
Coat the bowl with 1 tbsp olive oil,then place this dough in it and roll it. Cover this bowl with a damp cloth or a cling wrap and let it sit for 1 hr.

Stage 3 - Baking
The dough size will double after 1 hr, knead it again nicely and divide it into two parts and shape each portion to a bread loaf and put it is a well oiled 9x5 inch loaf pans and let it sit for another 45 min. It will rise to the edge of the pan.

Preheat the microwave at 210 C in convection mode and bake the loaf for 35 min.

Your bread is ready. Slice and toast and serve with your choice of spread.

Lunch in Crisostomo, Nuvali

0 komentar


One of my previous posts was about a nice Gardenia Plant Tour with a group of happy bloggers. After the tour and the open forum with Gardenia's president Simplicio Umali Jr., Mr. Nestor Constancia and the staff, we headed on to Nuvali for a late lunch, as if the bread buffet wasn't filling enough. :) 


Since I don't know anyone living in Laguna, nor do we even head to that direction, I

EASY BANANA CUPCAKES

0 komentar

This quick recipe makes 24 moist and fluffy cupcakes; as a matter of fact, they are even more moist the second day!! Great banana flavor and super easy to make.
¾ cup butter (room temperature)
1½ cups granulated sugar
3 large eggs
2 teaspoons vanilla extract
1 teaspoon rum extract (optional)
¾ cup buttermilk
1 cup OVER-RIPE mashed bananas (about 2 large or 3 small)
2½ cups all purpose flour
½ teaspoon salt
½ teaspoon baking soda
1 teaspoon baking powder

With an electric mixer beat the butter, sugar and extracts until its light and fluffy (2 to 3 minutes). Add the eggs, one at a time, beating well after each egg, scraping the sides down once in a while.

In a different bowl, mix the flour, salt, baking soda and baking powder.  Add these dry ingredients to the butter mixture (in thirds) and in between each flour addition, add a little of the buttermilk (starting and ending with dry ingredients).

Fill cupcake paper lined cupcakes pans about 2/3 full and bake in preheated 350F oven for 18-22 minutes (my oven took 20 minutes exactly).  Cool on rack and frost.  Store covered.

NOTE: Make sure you use very ripe bananas (the more brown speckles the better). There's tons of flavor in those brown bananas.

NOTE: If you don't have buttermilk, put 2 teaspoons white vinegar in a cup and then add enough regular milk to measure 3/4 cup. Let it sit for 10  minutes...works the same as buttermilk.

Sweet-SavoryTocino Fried Rice

0 komentar


I'm not really fond of fried rice. That is, if we are talking about the greasy, bland, fried rice infused with tons of yellow food color and topped with a scant amount of garlic. While I always opt for plain rice whenever we eat out, at home it is quite different. Everyone loves waking up to a hearty breakfast, right? Well, in my case, they are the ones to wake up to that because I'm doing

Weekday Potluck #3: Carbonara, Clam Soup and Beef Steak

0 komentar

Last week's potluck has almost gone bad with a few issues with inLinks, but everything was resolved and gave way to the second week of weekday potluck. I still am trying to get the hang of hosting a meme, and I'll probably make a few changes with the schedule and other things to make it more convenient for the participants.

While I love the idea of having an automatic link exchange for each

Crispy Juicy Jalebi

0 komentar


Hi friends I have been not very consistent in my posts due to some unavoidable reasons. Last month it was my hubbys birthday and I had asked him what special he wanted me to prepare and he instantly replied Jalebi. This is my third attempt and I had failed twice so this time I did more research on the net and got the perfection I wanted. It was a wonderful experience .

Jalebi has been always one of my favorite sweets,its crunchy outer crust and soft sweet inner juicy feel makes it divine. In punjab warm jalebis are eaten with a topping of curd and in west bengal it is eaten as a breakfast dessert. I never miss a jalebi treat when we go out to any punjabi dhaba.

Courtesy of the recipe goes to vahrehvah chef.

Ingredients
  • 3/4 cup maida (all purpose flour)
  • 1/4 cup corn flour
  • 2 drops orange food color
  • 1/4 tsp baking soda
  • 1 cup curd
  • 1 tbsp hot oil
Mix all the above ingredients without lumps in a deep bottom bowl, then add one hot tbsp of oil and mix again.cover it and let it sit in a warm place and ferment for 24 hours.

I kept it for 20hr and it was well fermented.Mix the batter nicely with spatula or hand and It should have a continous consistency,check if not add some maida or water to get the required consistency.

To make suger syrup ,take one cup sugar in a seperate bowl and heat with little water ,the sugar should dissolve and form a sugar syrup with one string consistency

Heat oil to a temperature between low to medium heat to fry the jalebis

( Click all images for enlarged view)

Take a zip lock bag and make a small hole at the bottom centre of it ,pour the batter into it ,slowly squeeze the batter and give a shape of swirl direct in the frying pan .

Swirl the batter into the oil and fry till light golden brown.

Remove the jalebi and dip in the syrup for 20 sec and remove it immediately

Note: While making these jilebi the batter should be flowy and consistent and the oil temperature should not be too hot. At the perfect temperature the jalebi whould rise from the bottom of pan slowly.

Watch the video on youtube

I am sending this recipe to a wonderful event "Bookmarked Recipes" hosted by Priya and Aipi

"Peanutella" Chocolate Peanut Butter Spread

0 komentar

I found this fabulous recipe over at Smitten Kitchen, and it was so much fun to make and even more fun to eat. If you like Nutella, you will LOVE peanutella, just think of the possibilities!!

Lets see, let me count the ways to enjoy peanutella: on waffles, on pound cake, on warm scones, in a sandwich, with s'mores, on waffles, as a fruit dip and...oh yes...right out of the jar!!!
2 cups shelled, skinned raw peanuts (see note)
½ cup unsweetened cocoa powder (best quality you can find)
1¼ cups powdered sugar
¼ teaspoon salt (plus a pinch?)
2 to 3 tablespoons peanut oil

Spread the nuts on a cookie sheet and roast in a 400F oven for 10 minutes, stirring half way through for even roasting.  NOTE: I couldn't find raw peanuts, so I used dry roasted UNSALTED peanuts and roasted them for only 5 minutes in the oven (to bring out more flavor).

Put the nuts in a food processor and process for five minutes. At first they will get mushy or pasty, but keep processing and the nuts will start to liquefy. Scrape down the sides of the food processor every once in a while.

Once the nuts begin to liquefy, add the cocoa powder, powdered sugar, salt and 2 tablespoons of peanut oil. Process for another minute or so. If the mixture seems too thick (it will thicken more in the fridge) add the other tablespoon of peanut oil. Taste the mixture, add another pinch of salt if you think it needs it.

That's it!! Store in the fridge (tightly covered) for up to a week.  This mixture might seem a bit thin at first, but it will thicken as it "sets" in the fridge.

How To Make Pasta

0 komentar


They say freshly made pasta tastes better than store-bought, and they are definitely perfect for the recipes featured in Vermicelli -- Indian Pasta. Quite frankly I am no expert at making pasta, but my dad has been making them since his childhood in Ilocos, where he has probably made a lot more miki (a popular pasta in Ilocos) than he knows. Whenever he makes a batch of pasta I'm always

Free Coffee to Boost Your Mojo

0 komentar


Whether you're a blogger, a columnist, or a student racking your brains out to get your mojo flowing, it's always nice to say that there's always a place where you can find peace and stimulation to get those creative juices flowing. If you're like most city dwellers who just can't find your home conducive to thinking, either from the noise of a nagging relative or the crazy running around of

Gardenia Bread Treats: Recipe Rundown

0 komentar


If you've seen my Gardenia Plant Tour post a few days back, I did mention that I will be posting a rundown of the recipes featured in the bloggers tour. While it's not surprising that you can do much more than a sandwich to serve to your kids, there's just something about these treats that would make you want to try them right then and there. My favorite would be the quesadillas that are made

CRISP BACON and GUACAMOLE SANDWICH

0 komentar


I first posted this idea a couple of years ago and then promptly forgot about it. However, summer is often too busy (or hot) to cook, so recently I dug into my files for a good sandwich idea and re-discovered this treat.

You will not find this delight on any health food menu and you won't find it on your weight watchers plan, but man oh man, is it tasty. Crisp fried bacon, on top of a thick layer of guacamole and topped with lettuce and tomatoes. You just have to say yes to a good sandwich some times!

The guacamole for these sandwiches is excellent:
3 avocados
juice of 1 lime
1 teaspoon salt
½ cup sweet (or red) onion diced small
3 tablespoons chopped fresh cilantro
2 Roma tomatoes diced small
1 teaspoon minced garlic
pinch of ground cayenne pepper (optional)

Mash the avocado with the lime and salt and then stir in the rest of the ingredients. You can use this right away, but the flavors blend better if it sits in the fridge for an hour or so.

Spread a nice thick layer of guacamole on your toasted bread, then top with crisp bacon, tomato slices and favorite lettuce.  Eat your sandwich in the shade with a tall glass of sweet ice tea !!

Get Your Mercato Centrale Fix With City Delivery!

0 komentar


It's been long since I wanted to go to Mercato Centrale and try all the dishes the weekend market is known for, but a trip to Bonifacio Global City from our place is a good, long ride, and so far I haven't mustered enough strength to drop by. Sometimes I wonder when would I be able to go around my own country and revel in all its glory: the food, the scenery, and the rich local culture, but

Weekday Potluck #2

0 komentar

I did get a number of emails telling me about the problem with the linkup, sorry it took some time to fix. I hope it's ok :) 
Last week's potluck was so filling! Thanks for bringing your food to feast our eyes upon. For the main dish, we had Miz Helen's Skillet Chops, wonderfully seared and baked. :) And with a steaming plate of Old Fashioned Hot Water Cornbread from Cooking With K to melt in

Turn Your Bread Into Much More Than A Sandwich

0 komentar


Bread has always been present in our tables every morning, and so far, I haven't seen a day without any form of bread be it the usual sliced bread my lola fondly calls tastee, the warm pan de sal, or any other fun-filled bread products my dad buys for my brothers who are still in school. But what can you do with the commercial pre-sliced loaves of bread other than the usual sandwich? A

Popular Posts

 
  • For Secret Recipe © 2012 | Designed by Rumah Dijual, in collaboration with Web Hosting , Blogger Templates and WP Themes