TOP 10 COMFORT FOODS

0 komentar

My mother used to say, the older she got the faster the years went by; now I know she was right !!  It seems like, just the other day, I was reminding myself to write 2011 on my checks; where did this year go ???

I looked back through my 101 posts for this year and tried to pick out the all time best ones (it wasn't easy), so I decided to narrow it down to OUR TEN FAVORITE COMFORT FOOD RECIPES.  I hope you enjoy them (

STARTING IN REVERSE:
CLICK ON THE RECIPE TITLE TO SEE THE RECIPE


This is a favorite of our grandchildren. Light as air and full of big air pockets that hold melted butter and jam, these are inexpensive, super easy and sure to please.


This is one of those busy day recipes that EVERYONE loves. The raw  noodles are cooked right in the sauce, so they are loaded with flavor. This one is a real keeper.

Glazed donuts are fun to make on the weekends. They put grocery store donuts to shame !!

You can make this pie a day or two ahead of time if necessary.
 It is a MUST for peanut butter lovers.

#6.  RED RICE

Some recipes are just for me. Picky-picky husband wouldn't even think of giving this recipe a taste (it has red peppers in it), but it is one of my all time favorites. IF you have any leftovers (which I seldom do with this recipe) it makes a wonderful lunch the next day.
#5.  CLASSIC JELLY ROLL CAKE


If you want to impress your company, try this easy jelly roll recipe. It gives step by step instructions on how to roll the cake. It is delicious and oh so pretty.
This photo does not do this cake justice. It is super moist, rich and delicious warm or cold. Personally, we love it on the warm side (not hot) with a big scoop of vanilla ice cream. Your family will love this perfect ending to a family meal.

#3.  UPSCALE SLOPPY JOES


We have always enjoyed sloppy joes, so I decided to try and make an upscale version that I could serve to company; the result was fantastic. Everyone loves this recipe of lean chuck roast cooked in the crockpot with sloppy joe seasonings. It is comfort food at its best !!!

This unassuming little sponge cake is a true winner. It can be used for a zillion
different recipes. It is light as air and makes the perfect shortcake.

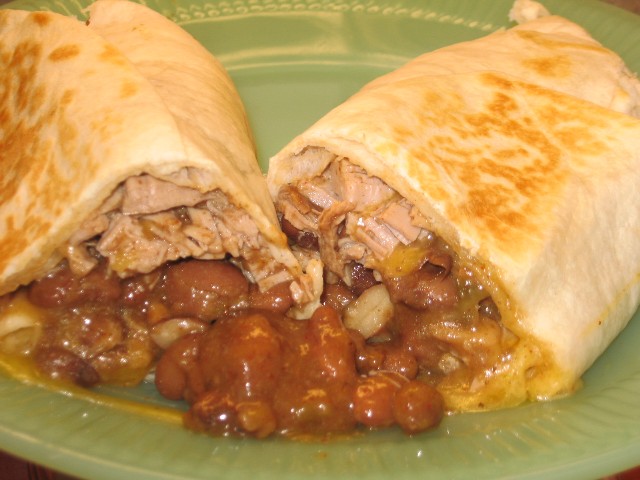
The NUMBER ONE comfort food recipe of the year HAS to be this Mexican pulled pork and pinto beans (done in the crockpot); I serve it over rice.  Not only is it super easy, but it is ultra-flavorful and the leftovers make outrageous burritos !!


MINI OREO CHEESECAKES

0 komentar

I served these little gems on Christmas Eve and they were a HUGE hit. Not only do they taste fantastic, but they are nearly fool proof.  Not a single crack in any of them and they go together in a snap. 

The only "extra" step, is that they really need to sit in the fridge overnight after baking (to soften the cookie crust), but this step is WELL WORTH IT. You can eat them as soon as they are chilled, but the cookie will still be crunchy.  If you let them sit in the fridge overnight, the cookie almost becomes part of the cheesecake...scrumptious.

24 Oreo cookies (divided)
1 pound of cream cheese (room temperature)
1/2  cup granulated sugar
1/2  cup sour cream
2  large eggs (lightly beaten)
1 teaspoon vanilla extract

Place 6 (original) Oreo cookies in the food processor and process into fine crumbs (set aside). Preheat your oven to 275 F and put 18 cupcake papers in your cupcake pan. Place a whole Oreo cookie in the base of each cupcake paper and set aside.

With your electric mixer (I used my stand mixer with a paddle attachment), mix the cream cheese on medium speed for three minutes.  Add the sugar and vanilla and mix for another 2 minutes on medium speed, or until very smooth. Add the lightly beaten eggs and mix on LOW until well combined. Fold in the sour cream and cookie crumbs with a spatula.

Fill the cupcake papers almost to the top (I used an ice cream scoop and it seemed to be the perfect measurement). Bake in preheated 275 oven for 30 minutes.

Once they are baked, leave them in the cupcake pan and immediately put them in the fridge. Chill overnight.  Delicious !!!

BRANDY SNAPS and a GIVEAWAY

0 komentar

First and foremost, I am excited to tell you that Shelby, at The Life and Loves of Grumpy's Honeybunch is hosting an anniversary blog party to celebrate her 4th year of blogging and we are all invited !!  Shelby has some GREAT recipes and I encourage you to pop on over to her web page and say Happy 4th Blogiversary!!  You can also enter her generous $50 giveaway while you are there (see her rules at the end of MY post today).

UPDATE: Peggy from Peggy's Pantry is the winner!!

Shelby's blogiversary party theme is "small bites, small plates and appetizers", so I am "bringing" BRANDY SNAPS, to the cyber party. This recipe is a festive little dessert I found on the Mennonite Girls Can Cook web page.

BRANDY SNAPS

This fun recipe is super quick and very impressive!!  It is basically a crisp, sweet, lacy, candy shell with whipped cream in it. The shells can be made up several days in advance, then filled with sweetened  whipped cream just before serving.

2 tablespoons sugar
2 tablespoons white corn syrup
1/4 cup butter  (I used only 3 tablespoons)
2 teaspoons brandy (or) 1 teaspoon vanilla (I used rum extract)
1/4 cup all purpose flour

Since this whole process goes VERY fast, it is best to have everything ready before you start cooking the above ingredients. Preheat your oven to 350 and line a cookie sheet with parchment paper (important). These candy shells REALLY spread as they cook, so only plan on making six of them on each cookie sheet.

Mix the sugar, corn syrup and butter in a small saucepan. STIR over medium heat until the mixture is good and bubbling, then remove from heat and stir in the flour and flavoring.

Drop one (measuring teaspoon per candy shell) of the cooked mixture onto the parchment paper. This will spread out into a circle about 4" in diameter as it bakes for about 6 to 7 minutes, but watch them very carefully, as they go from caramel colored to DARK very fast. It sounds tricky, but it isn't. My candy circles were fairly pale in color until they hit the 6 minute mark in my electric oven, but they were a beautiful light caramel color at 6½ minutes.

When they have turned a nice light caramel color, remove from the oven and let them sit on the cookie sheet for about 30 seconds. If they look a little oily, LIGHTLY dab them with a paper towel.

Use a pointed knife and lift the edge of the candy circle up a little so that you can grab it with your fingers (be careful, this is VERY  hot). One at a time, quickly roll the candy circle around the handle of a wooden spoon (they will cool almost immediately and hold their shape). Once you form it around the spoon handle, it will instantly be cool enough to slide the candy tube off of the handle, and it's done!!  If the other candies get too "hard" to roll, put them back in the oven for 30 seconds or so (but that shouldn't be a problem, as they stay fairly pliable as long as they are on the hot cookie sheet), they only become solid (or rigid) once they cool off.


I didn't use a spoon handle, I used some metal cannoli tubes I have and they worked perfectly (no need to grease the spoon handle).

Keep the cooled candy tubes in an air tight container until you are ready to serve them. Fill them with sweetened whipped cream (the candy tubes can be filled up to about an hour before serving).

Don't be scared off by any of my "warnings' about this recipe, it may sound complicated, but it really is super simple and I hope you try it.

NOTE: I substituted rum extract for the vanilla, the candy tasted like butterscotch. I think ANY extract would work.

NOTE: You don't have to fill these with whipped cream. Almost any mousse like whipped filling would work wonderfully.
~~~~~~~~~~~~~~~~~~~~~~~~~~~~~~~~~~~~~~~~~~~~~~~~~~~~~~~~~~~~~~~~~~~~~~~~
Details for The Life and Love's of Grumpy's Honeybunch giveaway (there are lots of ways to enter).

1. If you leave ME a comment today (telling me what your favorite holiday appetizer is), you will automatically be entered into Shelby's Anniversary giveaway contest.

2. For more ways to enter your name in the contest, visit the other bloggers that are helping Shelby throw this cyber anniversary party (she has a list of them on her web page). When you leave them a comment, your name will be entered again.

3.  The giveaway will end January 7th at 5 PM EST. 

4.  Shelby will announce the winner (on January 8th) on her web page.

5.  Winner will be chosen by random drawing (done by Grumpy himself).

6. The prize is a $50 gift card from ONE of the following: Sears, Kohls, Amazon, Target, Wal-mart, Chili's, Uno's, Marshalls/TJMax, Bed Bath and Beyond, Macaroni Grill, Olive Garden, Starbucks or Barnes and Noble.

7.  Giveaway is open to U.S. and Canadian residents only.


FOOL PROOF PEANUT BUTTER FUDGE

0 komentar

I hate using a candy thermometer, although I often do. I tend to gravitate towards classic old recipes that say "gently boil for xxx minutes"; I have the BEST luck with those old recipes.

This peanut butter fudge is a good example of one of the recipes I just described. I've made it many, many, many times and it has NEVER failed me.  You can either put it in a  11 x 7 pan or in mini-cupcake papers. The size of the pan doesn't really matter; just remember the smaller the pan the thicker the fudge.
In a large (heavy bottomed) sauce pan, mix:

2 cups granulated sugar
3/4 cup evaporated milk (do not use regular milk)
1/2 cup of good quality butter (do not use margarine)

Constantly stirring, over medium high heat, bring these three ingredients to a full rolling boil.  As soon as it reaches a boil that doesn't go away when you stir it, turn the heat DOWN (my stove burners go from 1-10 and I usually  bring it to a boil on setting 8, then turn it down to setting 3). My rule of thumb is...once it has come to that full rolling boil, turn the heat down by at least half...(you want to keep that full rolling boil going, but just barely). STIR CONSTANTLY.

Once you get that heat adjusted, set the timer for 6 minutes.  After 6 minutes, remove from heat and add:

12 ounces peanut butter chips (2 cups)
1 TABLESPOON of vanilla extract
1 cup dry roasted peanuts (chopped a little)

Stir until smooth and pour into foil lined pan (don't grease the foil). This foil will help you lift the cold fudge out when it is time to cut it up. Chill in refrigerator to "set" the fudge.

If you are putting the fudge into mini-cupcake papers, it makes about 3 dozen.

NOTE: This recipe works well with ANY flavor of chips,  I've used chocolate, dark chocolate, half peanut butter-half chocolate, etc. I'm guessing white chocolate would be pretty for the holidays too (any kind of nut will work too).

SPICED OATMEAL-CRAISIN COOKIES

0 komentar

We have all tried a LOT of oatmeal cookie recipes, some thick and heavy, some thin and crunchy, some bland and doughy. This cookie, however, is everything those "other" cookies weren't; it is tender, chewy, buttery, mildly spiced and they make your kitchen smell heavenly while baking; it is the perfect holiday cookie!!   


1/2 cup butter (room temperature)
1/2 cup butter flavored Crisco (important)
1 cup brown sugar (I like to use dark, but light works well also)
1/2 cup granulated sugar
2 eggs
1 teaspoon vanilla
1½ cups flour
1 teaspoon baking soda
1 teaspoon cinnamon
1/2 teaspoon ground cloves
1/2 teaspoon salt
3 cups quick cooking oats
1½ cups craisins (or raisins)

Cream together the butter, brown sugar, white sugar, vanilla, eggs and butter flavored Crisco (the combo is MUCH better in texture and taste than if you use all butter).

Combine the flour, baking soda, cinnamon, cloves and salt, then mix into the creamed mixture. Stir in the oats and craisins (I do all of this in my big stand mixer).

Roll into balls about the size of a small walnut and bake on ungreased cookie sheet (do not flatten) for 10 to 12 minutes (my oven takes 11 minutes) don't over cook. Let them cool for about 30 seconds before removing them from the cookie sheet.

Store in airtight container. Makes about 5 dozen.

DOG TREATS

0 komentar

If you want to make your dog very happy, bake up a batch of these "puppy treats". They are super easy to make and bake up hard and crunchy. They will "keep" forever, much like a commercial milk bone, but tastier.


I have been making these treats for our 7 year old dog since she was little. When the treats are baking, she stations herself in the kitchen, waiting for them to come out of the oven. We try to reserve them as a reward for good behavior, but in all honesty, it is so much fun to watch her catch them mid-air, that we usually give in; she dearly loves these!!!

2½ cups whole wheat flour (white flour will work too)
1/3 cup bacon grease (see note below)
1 egg
½ to ¾ cup milk
1 teaspoon garlic powder (not salt)
1 teaspoon onion powder (not salt)
3 heaping teaspoons beef bullion granules

Mix everything ( using the ½ cup of milk) into a STIFF dough (stand mixer works best). Beat until it comes together in a smooth ball. Everyones flour is different, so if the dough seems dry and won‘t hold together in a  smooth ball, just start adding the other ¼ cup of milk (one tablespoon at a time) until it holds together in a nice moist (but not sticky) ball (the dough texture should feel like freshly kneaded Play Doh).
Roll the dough into ropes about ½” in diameter. Cut the ropes into small pieces and put on an UNgreased cookie sheet (try to spread the pieces out; it's ok if they get sort of close to each other, but just make sure they are in a single layer. Cut small pieces for little dogs and bigger pieces for bigger dogs.


Bake at 350° for 40 minutes; remove the pan from oven  and shake the pan a little (the pieces should slide around easily).  Cool the treats right on the pan. When the treats cool, they will be as dense and hard as a commercial milk bone treat; your dog will thank you!!!

Chloe patiently being a "good girl" so I will  throw a treat.

NOTE: This recipe calls for 1/3 cup of bacon fat, sounds like a lot, but the recipe makes a LOT of treats. If you don't have bacon fat, peanut butter works well too.

NOTE: We keep Chloe's treats in a large peanut butter jar. We often find her staring at the jar, lol!!

PEANUT TASSIES

0 komentar

In my Christmas buying frenzy, I ended up with two big jars of honey roasted peanuts, so when it came time to make picky-picky husbands favorite Christmas cookie (pecan tassies), I decided to "throw him a curve" and made them with honey roasted peanuts. 
Guess what?!? He loved them, and gave them two thumbs up!!

PASTRY CRUST


1 cup unsalted butter at room temperature
6 ounces cream cheese at room temperature
2 cups all purpose flour

Cream the butter and cream cheese (with electric mixer) until it is light and fluffy. Add the flour and beat until the dough comes cleanly away from the inside walls of your mixing bowl. Flatten dough into a disk, wrap in plastic and chill for one hour (I NEVER chill this dough, it is a dream to work with).

FILLING

3 large eggs
3 tablespoons melted unsalted butter
1¾ cups light brown sugar
1 teaspoon vanilla
¼ teaspoon salt
1 cup coarsely chopped honey roasted peanuts
Beat the eggs until very well mixed and lemon colored. Stir in everything else, except the nuts.
ASSEMBLY

Roll pastry into 1 inch balls and place them into an ungreased mini-muffin pan. Using your fingers, press the balls of dough into the bottom of each cup and up the sides. Put a rounded teaspoon of chopped peanuts in the bottom of each pastry shell and top with about a
tablespoon of filling (remember that these puff up a little while cooking, so don't over fill them.
 
Bake in pre-heated 375F oven for 15-19 minutes or until the pastry is golden and the filling is set, yet still a little soft in the center.

When the tassies are fully baked, let them sit in the pans for about 10 to 15 minutes before you try and remove them (important). If you use a very thin bladed knife to help you lift the cookies out of the pan, they will come right out.
Merry Christmas!!!

Freshly Baked Eggless Cinnamon Rolls

0 komentar


These last couple of months I have been very busy with some personal engagements. Now I have the time I thought I can share one of my favorite baking creations. I wanted to make these eggless as I am sure there are lot of you who would want to try this out without eggs. I was pleasantly surprised that they tasted wonderful too ... so here is the recipe

Ingredients
  • 3 1/4 all purpose flour
  • 1 tbsp yeast
  • 4 tbsp butter
  • 4 tbsp sugar
  • 3/4 tsp salt
  • 1 1/4 cup warm milk
  • 1 tbsp olive oil
For spread
  • 4 tbsp sugar
  • 1 tbsp cinnamon
  • 1 tbsp butter
For glaze
  • 1/2 cup sugar
  • 1 tsp vanilla powder
  • 1 tsp butter
  • 3-4 tbsp milk
Stage 1 - Making the dough
Take a large bowl add sugar,salt, butter and yeast and mix nicely.Then add warm milk and let it sit for 10 min. After 10 min add the all purpose flour 1 cup at a time and knead for approximately 5 min or until the dough becomes smooth.Keep the dough aside.

Stage 2 - Resting the dough for baking
Coat the bowl with 1 tbsp olive oil,then place this dough in it and roll it. Cover this bowl with a damp cloth or a cling wrap and let it sit for 1 hr.


Stage 3 - Shaping
The dough size will double after 1 hr, knead it again nicely and divide it into two parts and spread it with a roller like chapatti and apply butter evenly and sprinkle cinnamon and sugar powder. Then roll it and cut into 1 inch thick swirls. Let is rest for 20 minutes.


( Click all images for enlarged view )
Stage 4 - Glaze Preparation
Preheat the oven for 180 Celsius. In the meantime whisk butter, sugar and milk till it reaches a thick flow-able consistency.

Stage 5 - Baking
Bake the cinnamon swirls for 30-40 min till golden brown. Remove the baking tray and let it cool. Drizzle the glaze over the rolls and let it sit. Serve warm and enjoy the cinnamon rolls.

Note: The temperature of milk should be luke warm to ensure the activation of yeast is perfect. If the yeast does not foam then the yeast is not activated properly, discard the solution and prepare fresh again.

CHRISTMAS SPRITZ COOKIES

0 komentar

Butter Spritz cookies are a classic, sweet, crisp (and light as a feather) cookie. They go together in a snap and when they are decorated with a little piece of candied cherry in the center (or any other holiday decoration you can think of), they are pretty enough for any Christmas cookie tray.

1 ½ cups butter
1 cup granulated sugar
1 egg
2 tablespoons milk
1 teaspoon vanilla
½ teaspoon almond extract (see note)
3 ½ cups all purpose flour
1 teaspoon baking powder

PREHEAT OVEN TO 375°. Thoroughly cream butter and sugar; add egg, milk and extracts and beat till smooth. Add flour and baking powder and mix until you have a nice thick, smooth dough. DO NOT CHILL IF YOU ARE GOING TO USE A COOKIE PRESS.

Place dough into cookie press and press cookies onto Ungreased cookie pan. Bake 10-12 minutes or until slightly browned around the edges. Cool cookies on a rack. Makes 7 to 8 dozen cookies (they are small).

NOTE: I sprinkle the cookies with sugar before baking, but you don't have to.

NOTE:  I make a variation of these that is Picky-picky Hubbies favorite. I omit the almond flavoring and instead, I add a full teaspoon of coconut extract. The final cookie doesn't taste like coconut, but it DOES have a wonderful sweet holiday taste, a lot like those Danish shortbread cookies that come in the round tin at Christmas (?)....very good.

NOTE: If you don’t have a cookie press, you can roll this dough into a log then roll the log in finely chopped nuts or sprinkles (pressing the nuts (or sprinkles) into the surface a little). Wrap the log in plastic wrap. Chill in fridge then slice and bake cookies until slightly golden.

Butterscotch Bread Pudding for Two

0 komentar

Bread pudding is one of those comfort food desserts and usually starts with a recipe big enough to feed an army. So, with a little tweaking, I've reduced the size of one of our favorites and it came out great.  We enjoy this butterscotch flavored bread pudding at room temperature and it makes an "over the top" late night snack.
5 slices of white sandwich bread (toasted in toaster)
1 cup heavy cream
1/4 cup brown sugar
1 tablespoon butter, melted
1 egg, beaten
1 teaspoon vanilla extract
1/4 cup butterscotch chips (good quality)

Toast the bread in the toaster and set aside to cool. When it is cool, tear in up into pieces about the size of a quarter.

In a medium size bowl, beat one egg; add the cream, sugar, vanilla and melted butter (whisk until well mixed).  Pour over the toasted and torn up bread and fold in the butterscotch chips. 

Let this mixture sit, at room temperature, for about 20 minutes (to soak up the liquid). At the end of 20 minutes, mix well.

Pour into a buttered 9" x 5" loaf pan and bake in preheated 350 oven for 30 to 35 minutes or until the bread pudding barely jiggles when you tap the pan.

Remove from oven and let it cool to room temperature before serving.

NOTE: After the bread has soaked up all of the cream-egg mixture, give it a good mix with a spatula (don't worry about the bread "breaking down").

NOTE: Use a good quality butterscotch chips. I've tried generic brands before and they were a little waxy tasting.

NOTE: Like any good bread pudding, it will be puffy when it first comes out of the oven, but then it will sort of "collapse" as it cools (this is normal).

CHERRY-ALMOND COFFEE CAKE

0 komentar

A lot of us have company over the holidays and it is always nice to having something tasty to serve with coffee or tea. This recipe is not only pretty, but would be wonderful for company of all ages.  Picky-picky hubby loves cherry, so I made this with cherry pie filling, but ANY pie filling would work well.


This cake is moist, rich and "holiday perfect" !!

2 cups flour
1 teaspoon baking powder
1 teaspoon baking soda
½ teaspoon salt
½ cup butter room temperature
½ cup sliced almonds
1 cup sugar
2 eggs
1 teaspoon vanilla
½ teaspoon almond extract
1 cup sour cream
1 (14 oz) can cherry pie filling (see note)

Grease a 9” spring form bundt pan. Beat butter till creamy, add sugar and beat until fluffy. Add eggs, one at a time, add extracts and sour cream, mix well. Add dry ingredients and beat until smooth. Spread half of batter into prepared pan. Top with half of pie filling (see important note below) and half of the almonds. Spoon remaining batter into pan and spread out. Top with the remaining pie filling and almonds.


Bake at 350° preheated oven for 45-60 minutes (my oven takes 52 minutes). Test with toothpick to make sure its done. Sprinkle with powdered sugar or drizzle with a vanilla glaze.

NOTE: Recipe says to use a whole can of pie filling, but I use the whole cherries in the pie filling and only about ¾ of the “goo”.

Popular Posts

 
  • For Secret Recipe © 2012 | Designed by Rumah Dijual, in collaboration with Web Hosting , Blogger Templates and WP Themes