Tasty Paneer Paratha with Zesty Hari Chutney

0 komentar


Stuffed Parathas can made in many different variations . They are very healthy and loved by children and can be had for breakfast and dinner. This version with paneer has a unique softness that can simply make you enjoy every bite.

Hari chutney is the perfect accompaniment for these paneer parathas which have a mild flavor. Coriander is blended with some unique aromatic spices that make it more zesty. 

Preparation Time: 20 min
Cooking Time: 30 min
Serves: 6 parathas

Ingredients:
  • 2 cups atta
  • 1/4 tsp ajwain
  • 1/2 tsp oil
  • pinch of salt
For stuffing
  • 1 cup grated paneer/cottage cheese
  • 1/2 cup fine chopped onions
  • 3 tbsp finely chopped cilantro/coriander
  • 4 finely chopped green chillies
  • 1/2 inch grated ginger
  • 1/2 tsp amchur powder
  • salt to taste

Preparation

Making Dough for paratha

Take flour,mix salt and ajwain to it then add three-fourth cup of warm water gradually, knead to make a smooth dough. And keep aside for 15 min.

To make filling
Mix all the above ingredients of filling nicely and keep aside

Making the paratha

Break the dough in 6 equal portions,roll each portion in a ball and flatten it by pressing.

Place 1 1/2 table spoon of stuffing on it and enclose it.Seal the edges completely so that stuffing does not come out.

Flatten again, sprinkle a little flour and roll them with a rolling pin to approximately six-inch diameter.

Heat a frying pan(tawa), place paratha on it and cook on moderate heat for three minutes.

Turn it and pour half a tablespoon of oil, spread it on paratha and shallow fry over low heat.

Turn it and again pour half a tablespoon of oil on other side, cook on low heat till golden brown

Serve hot with fresh coriander chutney

Hari Chutney


Ingredients
  • 1 big bunch corainder leaves
  • 1 small chopped tomato
  • 4-5 garlic pods
  • 1/2 inch ginger
  • 1/2 tsp cummin/jeera seeds
  • 1/4 tsp black salt
  • 1/4 tsp amchur powder
  • 2 green chillies
  • pinch of asafoetida/hing
  • salt to taste
Procedure

Blend all the above ingredients into a fine paste and serve with any stuffed paratha

SUNDAY MORNING FLUFFY BISCUITS

0 komentar

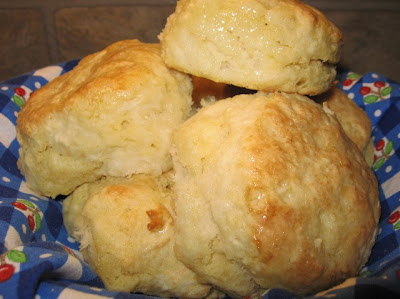
I have been biscuit "challenged" for many years, so when I'm in a hurry, I usually resort to a tube of commercial rolls and try to jazz them up, but they are pretty unmistakable (and getting expensive!!). 

The last few years, I've tried out a lot of biscuit recipes, in hopes of finding the perfect one; one that is flavorful, light, fluffy and EASY............here is my latest success...YUM!!!

Made with baking powder, baking soda, buttermilk AND yeast, these biscuits are light and fluffy. Hot out of the oven with butter and honey, they are a winner!!!

In a small bowl, mix 1 packet of dry active yeast, a pinch of sugar and ¼ cup of warm water (set aside). After a few minutes, it should be foamy like this:
2½ cups of all purpose flour
½ teaspoon baking soda
1½ teaspoon baking powder
½ teaspoon salt
1 tablespoon of white sugar
6 tablespoons Crisco flavored shortening
1 cup buttermilk (see note)

Stir dry ingredients together and then cut in the shortening until it is about the size of small peas. Stir in the dissolved yeast and buttermilk. Mix well, but do not over mix. Turn out onto floured board and roll to ¾” thick. Cut with a 3” biscuit cutter. Place on parchment paper and bake in preheated 400° oven for 12-14 minutes or until nice and golden. Brush with melted butter when they come out of the oven; they make fantastic breakfast sandwiches!!

NOTE: No kneading needed.

NOTE: This recipe does not work as well if you use butter instead of shortening. I use butter flavored Crisco in all my recipes that call for shortening.

NOTE: Don't be tempted to use your food processor when cutting in the shortening, it will process the shortening to much, it is better to have larger pieces of butter than super fine. I use my pastry cutter.
NOTE: Do NOT add all of the buttermilk at once. Add about 2/3 of it and see if that is enough. Personally, I think 1 cup of milk is too much, but everyone’s flour is different. Just flour your board enough so that the biscuits are not sticky.

NOTE: If you don’t have parchment paper, spray your pan with vegetable spray.

NOTE: Don’t use a twisting motion when you are cutting your biscuits. It seals off
the edges and they won’t raise very high.

Spicy Smoked Brinjal for a Lazy Day

0 komentar


This is a dish I learnt from my hubby.Perfect to have on any lazy day when we dont want to be in the kitchen for too long !!So simple to prepare and yet so relishable to eat with plain curd rice or hot steaming rice with a dash of ghee.

The smoky flavor of the brinjals has a unique taste thats hard to describe but taste wonderful. I am sure you would enjoy it too.

Ingredients
  • 6 medium sized lengthy brinjals
  • 1.5 tsp salt
  • 2 tsp chilly powder
  • 10 tsp olive oil
Procedure

Partly slit the brinjal along the length partly on one side. Rub a few drops of oil over each brinjal.Place them over the medium flame and slowly roast them turning them on all the sides evenly all over.


While the brinjals are being smoked take a small dish and mix the salt, chilli powder and olive oil into a soft smooth paste.

Once the brinjal are smoked and tender when pressed softly take them off the flame . Fill each brinjal along the length with about 1 tbsp of the paste prepared.

Serve the brinjals with curd rice or with hot rice with a dash of ghee and enjoy your lazy day.

VEGGIE SIDE SALAD

0 komentar

We still have a lot of snow around the edges of the yard (several feet of it as a matter of fact), but it won't be long before it's barbecue season again, so my thoughts are turning towards side dishes that can be prepared ahead of time. 


Summer Pea Salad, jazzed up with crisp bacon and tomatoes is one of my favorites. It is one of those great salads that travels well and tastes even better after it has been in the fridge for a day or two. If you are going to make this salad, in advance, don't add the crisp bacon right away (it will get soggy), just sprinkle it over the salad before serving.
16 ounce bag of frozen green peas
1/3 cup finely chopped red onion
1/2 cup grated carrot
1/2 cup celery chopped
1 cup thinly sliced mushrooms
1/2 cup red bell pepper chopped
3 slices of crisp bacon cut up
1/2 cup sharp cheddar cheese shredded (I use more)
cherry tomatoes, cut in half
sunflower seeds

Fresh green peas are the best in this salad, but when they are not available, frozen peas work very well too.  Microwave peas (covered) with 1 tablespoon of water for about 3 minutes or until slightly cooked (but not soft) then drain and cool.


In a large bowl, mix all of the above ingredients together (except the cherry tomatoes); gently fold in the dressing.


Dressing
3 heaping tablespoons of light mayonnaise
1 tablespoon freshly squeezed lemon juice
2 teaspoons sugar
1/2 teaspoon black pepper
1-2 tablespoons milk
Whisk the ingredients together and gently fold into salad.


Add cherry tomatoes and an extra sprinkle of cheese to the top of the salad for decoration. Cover and chill.
NOTE: Every microwave cooks at a different rate, so keep an eye on your peas when you microwave them. You don't want them to get overcooked and mushy.

Savory Buns For A Snack

0 komentar

Its been ages I did baking and so today I decided to bake something simple and special which will not go wrong !! For these savory buns I took the basic recipe from my stuffed buns and added some magical spices and the outcome was so exciting to watch. I am sure you will have much fun baking these savory buns and enjoy them with a warm cup of tea ..

Ingredients
  • 1 n 1/2 cups all purpose flour
  • 1 n 3/4 tsp active dry yeast
  • 1 tbsp sugar
  • 3/4 tsp salt
  • 1 tbsp chilli flakes
  • 1/2 tsp roasted cumin powder
  • 1 tbsp chopped garlic
  • 1 tbsp chopped cilantro
  • 1/2 cup warm milk
  • 2 tbsp warm water
  • 3 tbsp oil
For greasing the buns
  • 1/2 tsp milk
  • 1 /2 tsp oil
Step 1: Making the Dough

In a big bowl add yeast,sugar,salt n warm water let it sit for 10 min. It will become foamy. Then add oil , milk,chilly flakes,cumin powder,chopped garlic and chopped cilantro n mix nicely. Then add flour slowly 1/2 cup at a time n stir with spatula. Then take it out of the bowl n on a lightly floured surface knead it for 5 min n then make it into a ball. Grease it with oil then put it in a bowl n cover with a damp cloth n let it sit for 1 hr.

Step 2: Shaping
After a hour or till the dough become double.Take it out n punch it in the center to take all the air out.Now divide the dough into six parts n shape it into six to eight balls accordingly n let it sit for another 10 min.

Step 3: Baking

Preheat the oven at 350 F 15 min before baking n bake these buns for 15 min or till they golden brown.

Serving Procedure
Serve the buns once they cool or store them in a fridge reheat in microwave for 10 seconds or cut the bread horizontally, toast it on pan ,apply some butter n serve warm with a cup of tea.

CREAM PUFFS

0 komentar

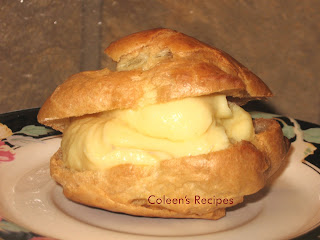
My dear English mother loved cream puffs and on rare occasions she would bring a couple of them home from the bakery in a small white box. We were allowed to "admire them", but we all knew they were a special treat for her and I can still picture her face as she closed her eyes and lovingly savored those first bites.

 I sure wish I had known how easy they were to make while she was still with us; I would have loved to make them for her; I miss you mom !!

CREAM PUFFS
1/2 cup butter
1 cup water
1/4 teaspoon salt
1 cup flour
1 tablespoon sugar (see note)
4 eggs
1 teaspoon vanilla (see note)

Mix the flour, sugar and salt in a small bowl and set aside. In a heavy bottomed saucepan, bring the water and butter to a boil.

Stir in the dry ingredients (all at once) and stir vigorously with heavy spoon until it comes together in a thick ball of dough. Remove from heat.

Put the hot mixture into a stand mixer, fitted with a paddle attachment, and start beating it on medium speed.  While the mixer is running, add the eggs, one at a time, beating well between each egg; add vanilla. Beat mixture for 2 or 3 minutes or until the dough is smooth and sticks to the sides of the bowl.

Drop by rounded tablespoons onto a parchment lined baking sheet.  Bake in pre-heated 425F oven for 20 to 25 minutes. They should feel light as air.

Remove from oven and this is important: Poke a small hole in the side of the baked cream puff to let out steam. If you don't, they might collapse as they cool. Makes about 18.

When the puffs are completely cool (they cool quickly), slice them in half, horizontally, and gently pull out any strands of extra dough you see (most of them won't have any). Put them back in a slightly warm oven for about 5 minutes to dry them out a little.

Fill them with anything you like. If you want to use them for a savory filling, like crab salad or something like that; I suggest that you leave out the sugar and vanilla in the recipe.

Cream puffs are great filled with fruit or whipped cream, or (our favorite) the following pastry cream.

PASTRY CREAM

2 cups milk (I use 1/2 and 1/2)
1/2 cup granulated sugar (divided)
1 teaspoon vanilla
6 egg yolks
4 tablespoons flour
3 tablespoons butter
pinch of salt

Heat the milk and 1/4 cup of the sugar in a heavy sauce pan over medium heat. 

Meanwhile, whisk the egg yolks and the other 1/4 cup of sugar until light in color, then add the flour and salt and mix very well (I do this with a little hand mixer).

When the milk JUST begins to boil, remove it from the heat and slowly drizzle about half of the hot milk into the yolk mixture (whisk like crazy when you do this). Once well mixed, put everything back into the pan and whisk while you bring it back to a boil.  Use a spatula to make sure everything from the edges is well mixed.

Bring to a boil, stirring constantly, and boil for about a minute (it will be very thick). Remove from heat and mix in the butter and vanilla.

Place plastic wrap directly onto the surface of the hot pastry cream and chill. This cream will keep well in the fridge for a few days.
Fill the cream puffs just before you serve them. Refrigerate any leftovers.

BACON

0 komentar

Mmmmm, Bacon!!

I am never frying bacon again!! Don't get me wrong, we are not removing bacon from our menu, it is just the frying method that I will never do again. Don't you hate cramming 4 or 5 pieces, at a time, into your largest frying pan... trying to get them all to lay flat as they curl up and leave those white fatty ends on each piece?!?!?  Me too, so I went on an Internet hunt for a "flat bacon miracle" and I found a super easy one!! Maybe everyone already knows about this method, but I sure didn't and I can tell you right now, I'll never fry bacon in a frying pan again!!

Using a large baking sheet that has a lip on it, spray it with a little cooking spray (probably not really necessary, but it makes for easier clean up) and line up the raw bacon slices, side by side, like this (my baking sheet cooked a 12 ounce package of bacon all at once.
Now, depending on how thick your bacon is and how hot your oven runs, it takes roughly 25 minutes in a pre-heated 350 oven to bake the whole package... no turning slices, no splattering in your oven, no bacon fat skin burns and no curly bacon....its magic!!

Start watching the bacon at about 20 minutes for regular sliced bacon (I've never timed the thick sliced stuff). It comes out absolutely perfectly flat and Picky-picky husband who is one of the strictest bacon critics that I've ever met, gave this bacon BOTH thumbs up and raved about what a great texture and taste it had.....well, blow me over!!
Not only is this a wonderful way to cook mass amounts of bacon, but it leaves your entire cooking range free for whatever!!

MAPLE PECAN PIE

0 komentar

Picky-picky husband quizzed me on what flavor pie I was making this morning and when I told him it was maple pecan, my "pecan pie purist" husband wrinkled up his nose and went silent...(no fear...I'm used to that response ha! ha!). However, I've noticed him cutting extra slices from the pie more than once today, so I'm guessing he approves (everyone else loved it too!!).

This recipe is a nice, sweet change from traditional pecan pie since it's made with real maple syrup and it goes together quick and easy!! 

2 teaspoons butter
1½ cups pecans
3 eggs
1 cup real maple syrup (not pancake syrup)
1/2 cup granulated sugar
1/3 cup melted butter
1 teaspoon vanilla extract
1/2 teaspoon maple extract
1/2 teaspoon salt

Melt 2 teaspoons of butter in a frying pan and toast the pecans for a couple of minutes. Be very careful because they burn FAST!! Let the toasted nuts cool for about 10 minutes before adding them to the pie filling.

Mix everything else in a large bowl, using a whisk to combine well.  Stir in the cooled pecans and pour this filling into an unbaked 9" pie shell.

Bake in a preheated 350 oven for 45 to 50 minutes or until the filling is set and puffs a little. My oven takes the full 50 minutes.  Cool to room temperature before slicing.

NOTE: The first time I made this pie, I didn't watch the pecans close enough and they scorched (an expensive lesson!!). So most of the time, I toast them in the oven while it is preheating (just to be safe).

Flavorful Drumstick Curry

0 komentar


Drumsticks pods and leaves are available all thoughout the year.

The pods are excellent cardio-protectors as they contain certain hypotensive compounds like thiocarbamate and isothiocyanate glycosides which help to lower blood pressure along with potassium. The fiber in the pods helps to lower cholesterol and prevent arterial clogs, thus reducing incidence of heart attacks and stroke
Source:http://blog.caloricious.com/2011/06/06/health-benefits-of-drumstick/

In south india it is very common to make dishes with drumstick, this curry is a flavorful combination of drumstick and cashew. It has a mild creamy flavor and the drumstick curry is a excellent accompaniment to rice.I am sure you will enjoy it

Ingredients
  • 5 drumsticks chopped at 4 inch length
  • 2 cups sliced onions
  • 2 cup diced tomatoes
  • 8 cashew nuts
  • 6 cloves garlic
  • 1/2 inch ginger
  • 1 tbsp coriander powder
  • 1/2 tbsp cummin powder
  • 1/4 tsp turmertic powder
  • chilly powder to taste
  • salt to taste
  • 2 tbsp oil
Procedure

Boil the chopped drumsticks for 10 min in a microwave with enough water that it may all just float and keep aside and dont discard the water.

Heat 1 tbsp oil in a pan, add the onions and cashewnuts and fry till onions become translucent

Add garlic ginger and fry for 2 minutes, then add tomatoes and let it cook till it becomes soft.

Let the above mixture cool and then grind it to a smooth paste.

Heat another 1 tbsp in the same pan, added this grinded mixture and all the above mentioned powders , stir nicely.

Then add the drumsticks and stir nicely, add the drumstick water and let it cook for another 10 minutes in a low flame. Check the consistently and add little water if required. Serve hot with rice

Simply Yummy Idly Fry

0 komentar


Idly fry has been one of my favorite quick and tasty delicacies to prepare, however they tend to be very oily in restaurants. So today I decided to prepare a healthier version with less oil and also make it tasty to eat.

Ingredients
  • 6 idlis
  • 1 cup diced capsicum
  • 1 cup diced onions
  • 1/2 cup diced tomatoes
  • 2 chopped green chillis
  • 2 table tomato sauce
  • 1/4 tsp black pepper powder
  • 1/4 tsp garam masala
  • salt to taste
  • 2 tbsp oil
Prodecure

Cut the idly into medium size chunks. Heat 1 tbsp oil in a pan and saute the idly in high flame until it has a crispy golden brown exterior. Keep aside

Heat another tbsp oil, add the onions, green chilli and saute for a minute, then add capsicum stir for another 1 min. Then add tomatoes and tomato ketchup, black pepper and salt and stir for 1 more min or until tomato becomes soft.

Now add the fried idlis to the above mixture and stir nicely.Then sprinkle garam masala over it and stir again. Serve hot.

VEGGIE CORN BREAD FOR EASTER BRUNCH

0 komentar

This super MOIST and tasty (veggie filled) corn bread starts out with two of those little Jiffy corn bread mixes (what could be easier?) and feeds a crowd. It is equally delicious warm or at room temperature, so it is perfect for a pot luck or holiday brunch.
 
(2) boxes Jiffy corn muffin mix
4 eggs (beaten)
1½ sticks butter (melted)
(2) cups broccoli florets (chopped)
1 cup of frozen corn (thawed)
1 medium onion (chopped) saute until tender
1 cup cottage cheese
1/4  teaspoon dry red pepper flakes (or to taste)

Saute broccoli, corn and onion until tender, set aside. In large bowl, beat 4 eggs together and stir in melted butter, cottage cheese and pepper flakes. Add Jiffy mixes and stir until smooth. Gently stir in broccoli, corn and onion. Spread in a greased 9 x 13 baking dish and bake (375°) for 35 to 40 minutes or until lightly browned.

LOTS OF VEGGIES INSIDE

NOTE: Finely diced sweet red pepper is pretty in this cornbread too, but I was out of it.

Popular Posts

 
  • For Secret Recipe © 2012 | Designed by Rumah Dijual, in collaboration with Web Hosting , Blogger Templates and WP Themes