Showing posts with label PARTY SNACKS. Show all posts

SWEET & STICKY WINGS

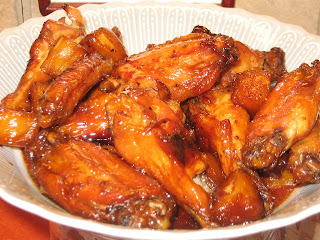
This is one of Hubbies all time favorite things to eat. Baked with a soy sauce, brown sugar and pineapple, these are  super simple and always a hit at parties.
2 pounds of chicken wings
½ cup soy sauce
½ cup brown sugar
½ teaspoon black pepper
20 ounce can of pineapple chunks (drained well)

Cut the wings into sections, discarding the wing tip (or buy already cut up party wings) and place in a 9" x 13" baking dish.  Mix everything else together and spoon over the wings.

Bake in a 350 oven (uncovered) for 2 hours, turning everything over every 30 minutes or so. Now I know that seems like a LONG time for chicken wings, but trust me, it does takes that long for the wings to "break down" and be sweet, tender, juicy and sticky!!

Remove the wings and pineapple from the sauce and serve   (discard the sauce).

NOTE: Do not omit the pineapple, the flavor and moisture content of the fruit is important to the cooking process.

NOTE: If you are still in doubt about the two hour cooking time, click on the above photo and you will get a better look at the wings themselves and you will see they are juicy and not overcooked.
EASY BUTTERSCOTCH ICE CREAM TOPPING

It is finally grilling season in Alaska and that means food, friends and family. Our crowd loves ice cream and I've been playing around with a variety of ice cream toppings. This quick and easy one is a big favorite right now, but I'm working on a pineapple topping as well.


EASY BUTTERSCOTCH ICE CREAM TOPPING
¼ cup butter
1¼ cups light brown sugar (packed)
16 large marshmallows
2 tablespoons light corn syrup
dash of salt
1 cup of evaporated (canned) milk
1 teaspoon vanilla extract
1/2 teaspoon rum extract

Melt the butter in a saucepan over low heat. Stir in the sugar, marshmallows, corn syrup and salt.

Stirring constantly, keep your heat very low until everything is melted and smooth then raise the heat to a medium low setting. Bring to a gentle boil (keep stirring) and boil for 1 minute.

Remove from heat and cool for five minutes. Stir in evaporated milk and extracts, mix until everything is very smooth.


Store in fridge (keeps for a couple weeks if it lasts that long). Tastes great cold or warm.

CHEESE PUFFS

0 komentar

Your guests will think you are a whiz in the kitchen when you serve these cheese puffs, but they are quick and easy to make and oh so good!!

Made from a basic cream puff dough and grated cheese, these bite size treats are FULL of air pockets and have a crispy-cheesy outer crust.  You can eat them right out of the oven, or get imaginative and fill them with anything savory.

1 cup milk
4 tablespoons unsalted butter
¼ teaspoon salt
pinch of cayenne pepper (or more if you like)
1 cup all purpose flour
3 large eggs at room temperature
½ teaspoon paprika (not the spicy kind)
½ cup grated Parmesan cheese (not the powdered kind)
1½ cups grated Gruyere cheese (see note)
coarse salt to sprinkle on top (see note)

Combine the milk, butter, ¼ teaspoon salt and cayenne in a saucepan and bring it to a boil. Once it starts to boil, remove it from the heat and add the flour all at once (mixing like crazy with a sturdy spatula) until the mixture comes together like this:
Return the pan to the heat and cook over medium heat for about a minute to dry out any excess moisture (stirring).

Remove from heat and put into a food processor and let it cool for five minutes. After the five minutes, process the dough for about 5 seconds. Add the paprika and eggs (one egg at a time) mixing well after each egg.

Remove from food processor and let dough cool for about 10 minutes. Mix in grated cheese and stir just enough to mix well.

Using a measuring tablespoon, scoop out a LEVEL TABLESPOON of the dough and push it off of the spoon (with your finger) onto a parchment paper lined baking sheet (try and keep the puffs as round as possible (but it isn’t critical).

Place them about 2” apart. Top each puff with a pinch of Parmesan and just a mini-pinch of coarse salt (see note below). Bake at 375° for 30 minutes (watch them the last 2 or 3 minutes so they don’t get too dark).

Serve warm or at room temperature. Just as soon as they come out of the oven, pierce the side of the puff with the tip of a small knife (to let any steam escape), this will keep them crispy longer.

Click on this photo to get a better look at the interior of the puffs

 NOTE: Make sure you have everything ready to go before you start making these puffs (cheese grated, flour measured, etc.) so that the liquid volume doesn’t boil away while you are grating your cheese, etc.

NOTE: Let the batter cool a little before you add the eggs so they don’t cook when they hit the hot dough.

NOTE: Lets talk about cheese. You can use any cheese you want but your results will vary significantly, depending on what kind you use.  The dough will puff up best when you use a hard, dry cheese.  If you use a wet cheese, like cheddar, your puffs MIGHT try to deflate when you take them out of the oven. They will still taste good, but they might not be crispy.

NOTE: If you are going to use the traditional Gruyere cheese…note that there are several different kinds of Gruyere. You want the dry hard one, not the semi-soft one.

NOTE ABOUT SALT: The recipe calls for a pinch of coarse salt on the top of each puff, but we don’t care for that…the Parmesan and Gruyere are pretty salty already.

This sounds like a lot of hassle, but once you make these, you will see that they are a snap and I have only one warning…they are addictive!!

ZIPPY CHEESE CRACKERS

0 komentar

These crackers are super easy to make and are a very nice addition to any snack tray or buffet table. I used sharp cheddar cheese in this photo, but pepper jack cheese makes an excellent cracker as well.


8 ounces shredded SHARP cheddar cheese (or pepper jack)
½ cup butter at room temperature
1 ½ cups flour
½ teaspoon salt
¼ teaspoon black pepper
pinch of cayenne pepper (leave out if you use pepper jack)
2 tablespoons water

Preheat oven to 350°. Mix above ingredients with electric mixer for 1 minute. This will look dry and crumbly, but thats ok. Pour out onto counter and squeeze ingredients together; form into a nice smooth 12” log.

Wrap in plastic wrap and chill at least a couple hours. Cut thin slices and place on parchment paper lined cookie sheet. Poke a few holes in each cracker with fork tines and sprinkle with a little kosher style salt. Bake for 20 minutes. Cool completely before eating.

NOTE: I usually chill my dough overnight.

NOTE: You can bake part of these and keep the rest of the dough in the fridge for up to a week (covered well).

NOTE: Original recipe said to slice these ¼” thick, but we didn’t like them at all. I sliced them a lot thinner and it was a huge improvement!!!

PECAN PIE MINI-MUFFINS

0 komentar

These little gems taste just like a Pecan Tassie. They are made out of 6 every day ingredients and are great with a morning cup of tea, or the lunch box or a long car ride (not at all messy). These are Hubby's "new" favorite snack. Store covered.
1 cup light brown sugar
½ cup flour
2 eggs
2/3 cup soft butter
½ teaspoon vanilla
1 cup chopped pecans

Preheat oven to 350°. Grease and flour a mini muffin pan (or spray with a cooking spray that has flour in it, like Bakers Joy). Mix the wet ingredients in a medium size bowl and then stir in the dry ingredients, its just that simple!!

Mix long enough to just get the batter smooth. Make sure you use the MINI muffin pans (not cupcake size). Fill cups with one tablespoon batter each (makes 24). Bake for 17 minutes.

NOTE: Dusting pan with flour is important.

NOTE: My oven cooked these in 16 minutes.

NOTE: Taking these out of the pan is the only (mildly) tricky part of this recipe. Letting the muffins cool for 2 or 3 minutes before you try to remove them from the pan will help a lot, but don't leave them in the pan longer than than that, since they will get harder to remove from the pan as they cool.

NOTE: Slide a  thin knife gently around the sides of the muffins, then gently lift them out using the knife.

NOTE: If you keep these muffins covered well, they will stay soft for a long time (they tend to get a little crispy around the edges if left out in the air).

BAKED ONION RINGS

0 komentar

Don't let this terrible photo fool you, these onion rings are deliciously addicting!! I found this recipe on Donna's blog over at My Tasty Treasures. There are only 2 tablespoons of oil in the whole batch, but you would never know it; this recipe is a keeper!!


The onion rings bake up light as air, super crispy and packed with flavor!!
.
1 medium size vidalia onion
1½ cups corn flakes
½ cup plain dry bread crumbs (I used Panko)
1 large egg
½ cup low fat buttermilk
¼ cup flour
1/8 teaspoon cayenne pepper
pepper to taste
.
Put the corn flakes and bread crumbs in the food processor and pulse until you get fine crumbs (set aside).
.
Mix the egg, buttermilk, flour, cayenne & black pepper. Cut the ends off of the vidalia onion and then cut the center of the onion into four thick slices. Separate the rings.
.
Dip the raw onion rings into the batter and set them on a baking rack so the excess batter will drip off (put a baking sheet under the rack, or set the whole rack in the sink to help reduce any mess).
.
Put 2 tablespoons olive oil (I used canola oil) on a rimmed baking sheet and put it in the oven for 2 minutes to preheat. After 2 minutes, remove the pan and tilt it to redistribute the oil. Coat the battered rings in the fine dry crumb mixture and place on the baking sheet.

Bake for 16 minutes in a 450 degree pre-heated oven (turn them over half way through). Remove from oven and sprinkle with coarse salt.

NOTE: I don't know if these would be as good with a plain yellow onion. I used vidalia's because they are our favorite. Any sweet onion would work.

SWEET & SPICY NUTS

0 komentar

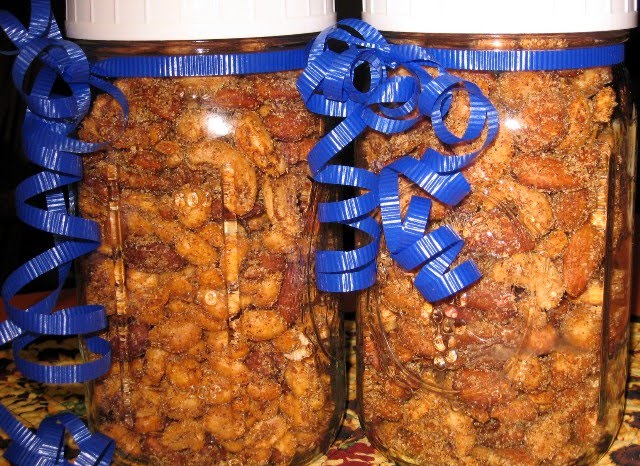
These nuts would be and excellent snack for New Years, or a great gift for a neighbor or co-workers birthday. I can see many uses for this sweet & spicy treat.

The following spice mixture will do 2 cups of nuts, so if you want to season more than 2 cups, just multiply the spices accordingly.
.
2 cups salted mixed nuts
1 tablespoon melted butter
2 teaspoons chili powder
½ teaspoon garlic powder
½ teaspoon onion powder
¼ teaspoon ground cinnamon
¼ teaspoon cayenne pepper
2 tablespoons white sugar
.
Mix 2 cups of salted mixed nuts with 1 tablespoon of melted butter (toss gently but make sure it covers well). Mix the spices together (all except the sugar) and sprinkle over the nuts (toss gently to make sure it covers well). Spread the nuts out (in a single layer) on a 10 x 15 baking sheet.
.
Bake in a preheated (300F) oven for 10 minutes. Remove from the oven and sprinkle with the white sugar (tossing well to coat). Cool completely (at least an hour). Store in an airtight container, at room temperature, for up to 3 weeks.
.
NOTE: After I sprinkled the hot nuts with sugar, I mixed them well and then transferred them to some paper towels, which removed any excess butter before they cooled.


NOTE: The nuts have a little heat, but they are not overpowering. If you really like to bump up the heat, add a little more cayenne.

NOTE: I used planters mixed nuts. There are 2 cups of nuts in an 11 ounce can.

Labels

CAKE RECIPES (20) CHEESECAKE RECIPES (9) CHICKEN RECIPES (8) CHOCOLATE DESSERTS (10) COOKIE RECIPES (19) Health (7) Kids Recipe (8) Mushroom (10) PARTY SNACKS (7) Potato (5) Rice (20) Snacks (22) Soup (17) Vegan (45) Vegetable (16) recipe (82)

Popular Posts

 
  • For Secret Recipe © 2012 | Designed by Rumah Dijual, in collaboration with Web Hosting , Blogger Templates and WP Themes