HOMEMADE FRESH NOODLES

0 komentar

The title of this post is my "gentle protest" in the noodle vs. pasta debate. I grew up calling them noodles, but all of the cooking shows call it pasta. Is there a difference? Perhaps the word pasta makes it sound fancier? Oh well, call me old fashioned.

I've been playing around with homemade noodle recipes since I got a little hand crank noodle roller for Christmas. This latest recipe uses all semolina flour and it was SO much easier to work than recipes that use all purpose flour. The back of the semolina flour bag suggested using the full sheets of this dough (uncut) for lasagna (without boiling) which I am looking forward to trying.

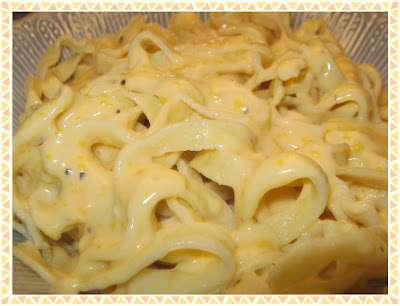
Homemade noodles in cheesy fettuccine Alfredo sauce
1½ cups semolina flour
½ teaspoon salt (optional)
2 eggs
2 tablespoons water
2 tablespoons olive oil (I used canola oil)

Combine the semolina flour and salt; add the beaten eggs, water and oil. Mix to make a very stiff dough. Knead for 10 minutes or until dough is elastic (I did this with my stand mixer). Cover with plastic and let the dough rest for 30 minutes (important)..
After 30 minutes of resting, turn the dough out onto a very lightly floured counter. Don't use too much flour on the dough before you put it through the machine, just enough to make it not sticky.


Start with pieces of dough about the size of a golf ball, maybe slightly larger. Flatten it out with your hand and taper one end of the dough so the machine will be able to "catch" the dough easily. Roll the dough through your machine on the lowest number two or three times (it will get longer each time).
.
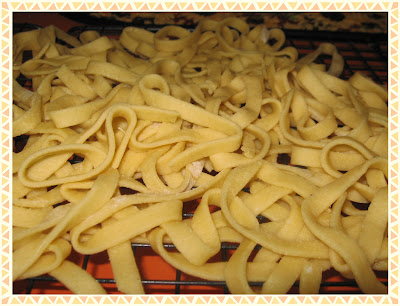
Set your dial to the next lower number and run the dough through again. Do this a couple times. My final machine setting was #3 and it was just right for fettuccine noodles.
.
You can air dry these noodles at this point or you can boil it like any other noodle; it takes a lot less time to cook if you don't dry it. Drain and use like you would any other noodle.


NOTE: You certainly do not HAVE to have a machine to roll out this dough. I have made many noodles by rolling out small balls of dough on a floured counter with my rolling pin. Just make sure you roll them out nice and thin then cut with a pizza cutter.

Pomegranate Cucumber Sesame Salad

0 komentar


(Click image for enlarged view)

Pomegranates are being hailed as a super-food which can protect the heart.

Scientists in Israel have shown that drinking a daily glass of the fruit's juice can reduce the risk of cardiovascular disease.

"Pomegranate juice contains the highest antioxidant capacity compared to other juices, red wine and green tea," said Professor Michael Aviram, who led the team.

This is good news, for antioxidants are the naturally occurring substances in plants that protect the body from free radicals - 'bad' chemicals in the blood.

Free radicals alter cholesterol in a process known as oxidation, which is thought to speed up the hardening of the arteries.

In studies at the Rambam Medical Center in Haifa, the juice of the fruit was found to slow down cholesterol oxidation by almost half, and reduce the retention of LDL.

That is the 'bad' cholesterol which forms atherosclerotic lesions, the fatty deposits which narrow the arteries and lead to heart disease.

"Antioxidants can protect us against the oxidative stress in our industrialised world, such as pollution, chemicals, viruses and bacteria, and consequently cardiovascular diseases and cancer," said Professor Aviram.


Pomegranate Cucumber Sesame Salad

Ingredients
  • 1 cup pomegranate seeds
  • 1 cup chopped cucumber
  • 2 tbsp chopped cabbage
  • 1 tsp toasted sesame seeds
  • 1/4 tsp honey
  • 1/4 tsp lemon juice
  • 1 tsp extra vergin olive oil
  • 1/4 tsp finely chopped green chilli
  • salt to taste
Procedure

In a bowl add the olive oil,honey, lemon juice, toasted sesame seeds with salt and mix nicely.

Now add the pomegranate, cabbage, cucumber and green chilli.

Toss well and serve chilled.

I am sending this salad to Pia wonderful event : Innovative Salads


and

hearthandsoulgirlichef

PUMPKIN CHEESECAKE WITH GINGERSNAP CRUST

0 komentar

Each little cheesecake (or two) is the perfect portion size and the gingersnap crumb crust goes perfectly with the pumpkin filling. This recipe makes 12 little scrumptious cheesecakes, but you could easily double it for a crowd.


 2/3 cup of crushed gingersnaps (about 15)
2 tablespoons of melted butter

Mix the crumbs and melted butter and put a scant tablespoon of the mixture into the bottom of 12 paper lined cupcake compartments; press down the crumbs into an even layer and bake in a 325 degree oven for 5 minutes. Remove and set aside.

8 ounce cream cheese (room temperature)
1 cup of canned pumpkin (not pumpkin pie filling)
½ cup of granulated sugar
1 teaspoon pumpkin pie spice
1 teaspoon vanilla

Cream everything together until very well mixed.
Beat in 2 eggs, one at a time, until well mixed.

Fill the paper cupcake liners ¾ full. Bake for 25-30 minutes at 325. My oven took 30 minutes. Chill in the pan for several hours. Remove the cupcake paper before serving and top with whipped cream.

Mixed Vegetable Paratha

0 komentar

( Click image for enlarged view)

Stuffed paratha are always special for breakfast or dinner. I love to try new stuffings and recently tried this combination and it came out very well. So here is the recipe

Preparation Time: 20 min
Cooking Time: 30 min
Serves: 6 parathas

Ingredients:
  • 2 cups atta
  • 1/4 tsp ajwain
  • 1/2 tsp oil
  • pinch of salt
For stuffing:
  • 1/2 cup chopped onion
  • 1/2 cup grated potato
  • 1/2 cup grated carrot
  • 1/2 cup cooked and mildly crushed green peas
  • 1 cup cauliflower
  • 1/4 cup chopped coriander
  • 2 green chillies finely chopped
  • 1 tbsp oil
  • 1 tsp to shallow fry each paratha
  • 1/2 tsp amchur powder or dry mango powder(optional)
  • salt and pepper to taste
( Click image for enlarged view)

Cooking Procedure:

Making Dough for paratha

Take flour,mix salt and ajwain to it then add three-fourth cup of warm water gradually, knead to make a smooth dough. And keep aside for 15 min.

To make filling

Heat oil in a pan and add onions and green chilli and fry till onion become translucent.

Add all the veggies and fry, cover and let it cook till it becomes soft.Add salt and pepper to taste. Switch off add the chopped coriander and amchur powder and keep aside.

Making the paratha

Break the dough in 6 equal portions,roll each portion in a ball and flatten it by pressing.

Place 1 1/2 table spoon of mixed veg stuffing on it and enclose it.Seal the edges completely so that stuffing does not come out.

Flatten again, sprinkle a little flour and roll them with a rolling pin to approximately six-inch diameter.

Heat a frying pan(tawa), place paratha on it and cook on moderate heat for three minutes.

Turn it and pour half a tablespoon of oil, spread it on paratha and shallow fry over low heat.

Turn it and again pour half a tablespoon of oil on other side, cook on low heat till golden brown.

Serve hot with fresh plain yogurt or raita.


LEMON - BUTTER COOKIES

0 komentar

I love it when you find a recipe that you know you already have all of the ingredients, even if you are snowed in, or haven't gone shopping in a while. That describes this super quick, super easy, super tasty lemon butter cookie.

¾ cup butter (room temperature)
1 cup white sugar
1 egg
2 tablespoons corn syrup
2 teaspoons lemon extract
1 teaspoon vanilla extract
2 cups all purpose flour
1 teaspoon baking soda
1 teaspoon baking powder
a little extra sugar to roll cookies in

In a medium bowl, cream together the butter and sugar until it is very light and fluffy (this takes a few minutes at high speed). Beat in egg, corn syrup and extracts. Add the flour, baking soda & baking powder and mix well.

Roll dough into 1" balls then roll the balls in granulated sugar. Place them on a parchment lined cookie sheet about 2 or 3 inches a part. Bake in preheated 325 degree oven for 12 minutes or until they are just golden around the edges.

2 Tier Fresh Vegetable Sandwich

0 komentar

This 2 tier sandwich has a unique flavor as it has ingredients like celery, oregano and olive oil in one tier and a tangy mint chutney to compliment it in another tier.

I prepared this sandwich recently for my hubby and he loved it as it had a lot of flavors embedded in it with a mild crunch to dig your teeth into. I can guarantee this sandwich with its refreshing flavors would win many hearts.!!

Ingredients

For tier 1 filling
  • Sliced Onion
  • Sliced Tomato
  • Sliced Cucumber
  • Sliced Carrot
For mint chutney
  • 1 cup mint leaves
  • 1/4 cup coriander
  • 1 green chilli
  • 1/2 tsp cummin powder
  • 1 tbsp lemon juice
  • salt to taste
For Tier 2 filling
  • 2 tbsp chopped celery
  • 1 tbsp chopped garlic
  • 1/4 cup onion
  • 1/4 cup chopped bell pepper
  • 1/4 chopped tomatoes
  • 1/4 tsp dry oregano
  • 1 tbsp olive oil
  • salt and chilli flakes to taste
  • 2-3 tbsp grated cheese (optional)
Procedure

Take all the ingredients of chutney and grind to a fine paste and keep aside.

Heat olive oil in a pan and add celerey,garlic,onion till onion becomes translucent.
Then add bell pepper fry for a min then add tomatoes and fry till it becomes soft.
Then add the oregano,salt and chilli flakes. Stir and keep aside.

Toast the middle bread slice and keep aside

(Tier 1)

Take one bread slice apply the chutney and place a couple of slices of tomato, onion, carrot, cucumber and cover with toasted slice.

( Tier 2 )

Now spread the bell pepper mixture on the other side of toasted slice, sprinkle grated cheese and cover with the 3 bread slice.

Toast it on tawa or grill sandwich maker and serve hot with some ketchup.

Note : Toasting the middle slice ensures the crunchiness as your bite through it

FUDGE CREAM PIE

0 komentar

I decided to try this chocolate pie recipe because it looked so simple. You do not have to temper the eggs, no complicated steps and multiple bowls to deal with. It is super quick, super easy and produces a super thick chocolate filling. It was a huge hit for the chocolate lovers at our house!!
9" baked pie crust
1¼ cups white sugar
2 tablespoons flour
4 tablespoons cornstarch
¼ teaspoon salt
2 cups milk
4 egg yolks
2 one ounce squares unsweetened chocolate
1 tablespoon butter
1 teaspoon vanilla extract

In medium saucepan, combine sugar, flour, cornstarch and salt. In a medium bowl, beat milk and egg yolks until smooth. Gradually stir the milk mixture into the saucepan that has the sugar mixture in it. Cook over medium heat (stir constantly) until the mixture comes to a full boil. Boil and stir for a minute or two or until it's very thick.

Remove from heat and stir in the chocolate, butter and vanilla until the butter is melted. Pour into baked pie shell.

Place plastic wrap directly onto the surface of the hot filling (this will prevent a skin from forming on the pudding). Chill overnight. Top with whipped cream and chocolate curls.


This isn't a very good photograph, but it gives you an idea of what the filling looks like.

Pongalo Pongal, Wish you all a very happy pongal

0 komentar


(Click all images for enlarged view)

Wish you all a very happy pongal and may every year be filled with prosperity and joy.

As per tradition we prepared pongal , vada with tamarind chutney and radish sambar for breakfast today ... I did not have the time to write the recipes but I am sure all of you would know how to prepare them : )

Green Around the Gills

0 komentar

Substituting the portobella mushroom for a beef patty is nothing new. And why wouldn't it be? It's easy and quick. If you feel you eat too much red meat (which I and much of North America does), portobella is an excellent alternative to a burger.

Last post, I was discussing everyone's favourite fungus, the mushroom. But there is way too much to cover and so I had to cap it off.

What many people may or may not know is that the common white mushroom, the cremini and the portobella mushroom are basically the same thing. What differs them from one another is the maturity level. I imagine many of you can figure out which mushroom has been allowed to grow the longest. That's right! You guessed it. It's the portobella. Or is it the portobello? Oh, whatever. You get what I mean. Because the portobella has been allowed to mature and grow, the gills can bleed quite extensively. Some chefs I've worked for would cut out the gills while other chefs couldn't be bothered. In my opinion, I leave them in for most recipes and will cut them out for only a few recipes. For example, Mushroom Polenta or Cornbread. The gills bleed and makes the polenta very grey looking and very unappetizing. Or maybe a chowder or a cream sauce where I want to retain the white colour. As you can see, I determine it for the sake of appearance. Not so much for texture or flavour.

Then again, many of you may not care about the appearance. But, I think, to a certain degree, everyone does. Every time we go grocery shopping, we are bombarded with magazine covers where the dishes look ridiculously delicious. Or on T.V. where these chefs seem to make these gorgeous dinners in less than half an hour. And because of this, can it not be said that we start to want our own food to look this good all the time? Appearance matters. When you buy beef, do you normally base your judgment on the redness of the beef? Even though the colour can be very deceiving. Sure, grey beef is not usually a good thing, but just because the alternative is red, doesn't mean it's fresher. With a quick flash of carbon monoxide, that meat can stay red much longer after it's gone rancid. Scary. How about produce? If you see two red peppers where one is a perfect shape and other looks curled over and slightly disfigured. Which do you buy? If you said the perfect one, why? Will it taste better?

Anyways, appearance matters whether we like it or not. So, keep the garnishes coming!

Grilled Portobello Mushrooms on a Foccaccia


6 Large Portobello Mushrooms, washed
1 Red Pepper
100 ml Balsamic Vinegar
100 ml Oil
2 Garlic Cloves, crushed
Drizzle of Honey
1 Package of Arugula
Small Package of Blue Cheese (Gorgonzola is good), crumbled
6 Foccaccias
Salt and Pepper to Taste

Score the cap of the mushroom with two cross hatches.

Marinate mushrooms in oil and balsamic vinegar and two cloves of crushed garlic.

Coat red peppers with oil and grill peppers until blackened on the outside. Place in a sealed bag and close. Steam through for 10 minutes. Remove and let cool. Peel skin away and discard innards. Keep flesh of peppers.

In a hot grill pan or on the BBQ, grill mushrooms for 3 minutes per side. Remove and cut in half.

On a foccaccia, rub last clove of garlic on the inside. Place arugula, peppers and mushrooms in panini. Add desired amount of cheese.

Makes 6 sandwiches.

A Humble Chef's tip: if it's winter time, cook your peppers in the oven at 400 for 30 min. Less smoke will emit if you roast them.

Variation: Goat's Cheese over the blue if you don't like blue cheese.

BAKED ONION RINGS

0 komentar

Don't let this terrible photo fool you, these onion rings are deliciously addicting!! I found this recipe on Donna's blog over at My Tasty Treasures. There are only 2 tablespoons of oil in the whole batch, but you would never know it; this recipe is a keeper!!


The onion rings bake up light as air, super crispy and packed with flavor!!
.
1 medium size vidalia onion
1½ cups corn flakes
½ cup plain dry bread crumbs (I used Panko)
1 large egg
½ cup low fat buttermilk
¼ cup flour
1/8 teaspoon cayenne pepper
pepper to taste
.
Put the corn flakes and bread crumbs in the food processor and pulse until you get fine crumbs (set aside).
.
Mix the egg, buttermilk, flour, cayenne & black pepper. Cut the ends off of the vidalia onion and then cut the center of the onion into four thick slices. Separate the rings.
.
Dip the raw onion rings into the batter and set them on a baking rack so the excess batter will drip off (put a baking sheet under the rack, or set the whole rack in the sink to help reduce any mess).
.
Put 2 tablespoons olive oil (I used canola oil) on a rimmed baking sheet and put it in the oven for 2 minutes to preheat. After 2 minutes, remove the pan and tilt it to redistribute the oil. Coat the battered rings in the fine dry crumb mixture and place on the baking sheet.

Bake for 16 minutes in a 450 degree pre-heated oven (turn them over half way through). Remove from oven and sprinkle with coarse salt.

NOTE: I don't know if these would be as good with a plain yellow onion. I used vidalia's because they are our favorite. Any sweet onion would work.

Andhra Style Chintapandu Pulihora

0 komentar


Chintapandu (Tamarind) rice is commonly prepared in our household during festival times. This was prepared recently . This version is the traditional andhra style and it has got a nice tangy flavor. It is a tradition to prepare bobbatlu too ( and this is a wonderful combination for festival times). So here is the recipe for tamarind rice andhra style.

Ingredients
  • 1 cup rice
  • a big lemon size tamarind soak in 1 cup water
  • 4 red chillies
  • 1 tbsp channa dal
  • 1 tbsp urad dal
  • 1 tsp musturd seeds
  • 1/8 tsp fenugreek seeds
  • 3 springs curry leaves
  • 1 green chilli
  • 1/8 tsp hing
  • 1/2 tsp turmeric
  • 1 tsp jaggery
  • 1/8 cup oil
  • salt to taste
  • 1 tbsp coriander seeds
  • 1/4 tsp fenugreek seeds

Cooking procedure
Soak the tamarind in warm water for 30 min ,then nicely squeeze and extract the pulp and keep aside

Cook the rice with 2 cups of water and with a 1 tsp oil in pressure cooker for 3 whistles .

Dry roast coriander seeds and methi seeds till a nice aroma came n let it cool after that make a fine powder and keep aside.

Heat oil in a pan add chana dal,urad dal ,mustard seeds ,fenugeerk seeds and when mustard seeds starts to splutter add red chilli,curry leaves,turmeric and hing and stir for 30 sec ,then add tamarind pulp and jaggery and stir n cook till the mixture become a thick and when oil begins to saturate switch off the flame and let it cool.

Mix the above mixture to the rice till it blends nicely with rice ,then mix the coriander ,methi powder nicely ,then cover n keep aside for 30 min before you serve

Note :
  • You can prepare the tamarind paste before ,store in the jar and refregirate it ,use when ever u want .
  • If u add more jaggery then will get the sweeter version of pulihora
  • Adding corander n methi powder will give nice twist to this tangy rice

TACO BELL RED SAUCE CLONE RECIPE

0 komentar

I admit it, there are certain items that I really enjoy at Taco Bell. Yes, I know it's not authentic Mexican food, but when you like something, well, you overlook things like that. One thing I enjoy at TB is a warm condiment called red sauce. It is not the (cold) hot sauce that comes in a packet; it is the steaming hot red sauce that is served on their tostados and their Mexican pizza. This recipe is about as close to the original taste as you can get!!!
1 8 ounce can of tomato sauce
1/3 cup water
¼ teaspoon chili powder
1½ teaspoon ground cumin
1½ teaspoons dry onion flakes
1 tablespoon white vinegar
½ teaspoon garlic powder
½ teaspoon garlic salt
¼ teaspoon paprika
¼ teaspoon white sugar
¼ teaspoon cayenne pepper
Mix everything and simmer (on very low) for 15-20 minutes. Serve hot. The "spice level" is very moderate if you use it right away. It is a little spicier if you let it sit in the fridge overnight.
Serve (as a hot condiment) with any Mexican food.


I like this as a dip for chips too.
NOTE: I was surprised to see that there is vinegar in this sauce (you can't taste it in the final product).
NOTE: I don't usually buy garlic salt. I just mix it up with 3 parts salt to 1 part garlic powder, stir well.


Beerakaya Dosa With Coconut Chutney

0 komentar

( Click image for enlarged view )

Ridge Gourd vegetable which is known as beerakaya in telegu is used to make a dosa which is very healthy breakfast alternative to regular dosa.Ridge gourd is also known by other names such as loofah, luffa, turai, turiya, tori etc. Originally believed to be originated in the Arabic desserts, this vegetable has spread throughout the world. It is very colorfull and tasty dosa .The preparation process is very simple too. Serves 8-10 dosas

Ingredients

  • 3 cups washed thuroghly and chopped ridge gourd ( peel gives green color )
  • 1 cup moong dal
  • 3 tbsp rice
  • 2 green chilli
  • 1/4 tsp turmeric
  • pinch of hing
  • salt to taste
For toppings
  • 1 cup chopped onions
  • 2 tbsp cumin seeds
Cooking Procedure:

Wash and soak the rice and moong dal for 1/2 hr, then make it into a smooth and fine paste with all the above ingredients.Keep aside.

Heat a tawa and pour one handfull batter and spread it with circular motion like dosa,it should be not too thick nor too thin and about 8 -10 inch diameter

Top it with a sprinkle of chopped onions and cumin seeds.

Add few drops of oil around it and let it cook for a min then flip it n again add few drops of oil. Remove when both sides are properly cooked and looks slightly crispy.

Coconut Chutney
  • 1 cup grated coconut
  • 1/2 cup roasted chickpeas
  • 1 tbsp chopped cilantra
  • 2 green chilli

Preparation

Grind all the above ingredients to a smooth paste.

For tempering
  • 1 tsp oil
  • 1/2 tsp mustard seeds
  • 1 red chilli
  • 1/4 tsp cumin seeds
  • 1 spring curry leaves
  • pinch of hing

Heat 1 tsp oil add the mustard seeds, once it splutter and rest ingredients and pour on the chutney

Girls Just Wanna Have Fungus

0 komentar

When you break down what a mushroom is, it seems a bit strange that we eat it. I mean, it's a spore bearing fungus. It's not a plant. It's weird, isn't it? And yet, so delicious. I suppose the same can be said about drinking the milk from a cow or a goat. It's a bit weird.

It is a goal of mine to learn how to pick mushrooms (a mycophagist they are known as) and certainly intend on going through with it. Where I live, there are pockets of morel mushrooms which I never had growing up. But, as an adult, have become quite fond of. If you've never seen a morel, they are quite different in appearance to common mushrooms you buy at the grocery store. They have a cool honey comb look to them. However, you can buy them at most major grocers dried (much like porcini) and are usually very expensive. At least for a humble chef like me.

However, there are many other types of 'shrooms that you can eat that are much more affordable. They usually have a stem, cap and gills. We all know of the white mushroom that are usually farmed and delivered across the continent. In the same family is the ever popular cremini and portobella. I am fond of shitake, enoki and somewhat indifferent to oyster. But that's just me. In all, there are supposedly 14,000 varieties. Wow.

It goes without saying, here is a vast amount information to give about the intrepid toadstool, but that would be over-bearing. So, I will break up mushrooms 101 into several posts.

Here is a super duper easy recipe that is strictly an appetizer.

Field Mushrooms on Crostini

2 Baguettes, cut in rounds
1 White Onion, medium dice
1 Clove of Garlic, crushed
2 Sprigs of Fresh Thyme
Juice of a Lemon
200 ml Olive Oil
25 – 30 Mushrooms, cremini, portobella and shitake
150 g Asiago Cheese, grated
Salt and Pepper to taste

Preheat oven on roast at 400. On a baking sheet, lay out crostinis. Drizzle some oil over top and sprinkle a pinch of salt and pepper. Roast in oven for 5-7 minutes or until golden crusted.

In a large frying pan, heat oil. Saute onions and garlic for 3 minutes. Add mushrooms and cook for 2 minutes. Add lemon juice and continue to cook.

Let cool and add thyme and asiago garnish.

Season carefully to taste.

Makes about 30 crostinis.

Variation: serve the cooked mushrooms in phyllo cups as a side to a steak. Cool.

A Humble Chef's tip: be generous with the garlic. It tastes good.

MUFFIN POPPERS

0 komentar

My husbands winter occupation (hobby) is restoring vintage snowmachines. He has a shop on our property and needless to say, there are days when very little "restoring" happens because the shop is full of his buddies discussing their most recent snowmachine adventures. When the shop is full, I enjoy sending out a big plate of baked goods to get their opinion on a new recipe. Today, I sent these (super easy) little muffin poppers out and the "guys" hovered over them like vultures (a good sign), the little gems got a big thumbs up.

2 cups flour
¾ cup granulated sugar
2 teaspoons baking powder
¼ teaspoon freshly grated nutmeg
¼ teaspoon cinnamon
1 teaspoon salt
¾ cup buttermilk
2 eggs, beaten
1 teaspoon vanilla extract
2 tablespoons melted butter

Preheat your oven to 400 and lightly grease/spray a mini-muffin pan with vegetable spray.

In a large bowl, mix the dry ingredients, then stir in the buttermilk, eggs, vanilla and melted butter. Beat together until well blended.

Fill mini-muffin cups about ½ full. Bake in 400 degree oven for 12 to 15 minutes (my oven took 13 minutes) or until they spring back when touched.

Let the little muffins cool a minute or so, then remove them from the pan. Brush all surfaces with melted butter and roll in cinnamon sugar. Serve warm (but great room temperature too).


NOTE: This recipe makes about 3 dozen mini-muffins.

Cinnamon Coated Chocochip Cookie

0 komentar


( Click image for enlarged view )

Hi blog buddies hope you all enjoyed your new year, thank you for all your wishes and bearing my absence ... today my niece Rithika asked me why I was not posting any recipes, she is 7 years old and I realized its time I get back to blogging.

I am dedicating this yummy cinnamon coated chocochip cookie to her.I am sure any kid will enjoy it as they got a nice soft texture and a mild crunchy feel with a yummy flavor, try this and I am sure you would enjoy it too.

Preparation time :15 min
Baking time :15 min
Makes :24 cookie

Ingredients:
  • 2 cups all purpose flour
  • 1 cup butter
  • 3/4 superfine sugar
  • 2 tsp orange extract
  • 1/2 cup semisweet chocochip

    For cinnamon coating
  • 2 tbsp superfine sugar
  • 2 tbsp ground cinnamon powder

Baking Procedure

Put the Microwave to convection mode and preheat to 275 F/190 C,line the cookie sheets with parchment paper

Take a bowl and mix butter and sugar nicely, add orange extract then add flour,salt and mix nicely. Then add chocochip and mix till all are blended completely. Keep aside

For coating mix the sugar and cinnamon powder.Keep aside in a plate.

Divide the dough into 24 parts,roll each into a ball,then roll the ball on the cinnamon mixture nicely. And press lightly.

Now lay the cookies on the cookie sheet and bake for 15 min or till golden brown.

Immediately remove from oven and let it cool completely on the cooling rack.

Then store in a air tight container and enjoy your cookies.

SESAME CHICKEN

0 komentar

Our Safeway store has the best sesame chicken and I've tried to recreate it, several times, with minimal luck. However, this last try was very good and even Hubby liked it!!
 2 tablespoons soy sauce
1 tablespoon cooking wine
3 drops sesame oil
1 teaspoon vegetable oil
2 tablespoons flour
2 tablespoons corn starch
2 tablespoons water
¼ teaspoon baking powder
¼ teaspoon baking soda
½ teaspoon onion powder
Mix the above ingredients thoroughly, then add 1½ pounds of chicken breast cut into 1" cubes. (see note) Stir to coat and chill for 30 minutes before frying.
..
SAUCE (this cooked sauce is poured over the cooked chicken)
½ cup water
1 cup chicken broth
2 tablespoons white vinegar
½ cup granulated sugar*
¼ cup corn starch
2 tablespoons soy sauce
1 teaspoon sesame oil
¼ to ½ teaspoon red pepper flakes**
1 clove garlic minced
.
Bring to a boil (it gets very thick). Keep warm while you fry the chicken
.
Deep fry the chicken cubes, a few at a time, until they are done and batter is golden. Keep warm in oven while you fry the rest. Just before serving, add some of the sauce to the chicken and gently stir (you might not need all of the sauce) .
.
Serve over hot rice.

NOTE: Original recipe called for a full cup of sugar, but that seemed like overkill. I used ½ cup and it seemed perfect.
.
NOTE: We are very shy of extra-spicy food. I used ¼ teaspoon of the red pepper flakes and it was VERY mild. I think next time, I will use ¼ teaspoon + an extra pinch.
NOTE: The recipe calls for chicken breast, but we prefer either chicken tenderloins or boneless thigh meat.

Putting On The Schnitz

0 komentar

Before going to culinary school, I knew I enjoyed cooking but I really didn't know much about different techniques. However, the three stage breading station was something I pretty much grew up on. I've never really thought about it until recently. It turns out that the breading station is used throughout most of the world. It seems to be just as common as making a sandwich.

The breading station is a three step process where you dredge whatever it is in seasoned flour, then covered with plain egg wash and then coated with seasoned breadcrumbs. A classic technique that has been used for a very long time.

The recipe today is a simple Schnitzel with a slight variation. But, even here in Canada, I'm not always sure what to call it. I suppose some days it's a scallopine or even a cotoletta alla milanese. But here we get into little details that even I find very confusing. Schnitzels and scallopines are usually made with an escalope rather than cotoletta alla milanese which uses a cutlet. What's the difference between an escalope and a cutlet you ask? Ummm, glad you asked. Let me pull out my old textbook and let me see. Aha! Found it. A cutlet is a slice of meat that usually comes from either the leg or the rib and is usually very thin. An escalope is boneless slice of meat, often from a loin, and is pounded out to make it thin. Got it? I'm sure many of you reading this will forget everything I've written anyways. Not exactly life changing material. Nevertheless, you can now strike up a conversation with your favourite butcher. I find it very awkward talking to butchers. Seems like I'm always trying to break the ice with them. But it's very hard. They can be quite intense. Maybe it's just me but when a gentleman who maintains eye contact while covered in blood, holding a cleaver, surrounded by dead animals and talking about municipal politics (and is hopefully not missing any teeth), I am slightly intimidated.

Anyways, no more silliness. Here's a recipe! You read it. You make it. You serve it. You eat it.

Pork Schnitzel


8 Thin Pork Cutlets
150 g Flour (about 1.5 Cups)
4 Eggs, whipped
150 g Seasoned Bread Crumbs (about 1.5 cups)
2 Lemons, zested then cut into wedges for garnish
100 g Cheddar Cheese, grated (about three quarters of a cup)
Drizzle of Honey Dijon
Salt and Black Pepper to Taste
Canola Oil for searing

In a bowl, combine bread crumbs with zest and grated cheese.

Dredge cutlets in seasoned flour. Drizzle mustard and spread evenly. Place in egg wash and then in bread crumbs. Repeat with remaining cutlets.

In a large skillet, pour generous amounts of oil and heat well. Sear both sides until brown, If not quite cooked, place in oven at 350 until cooked; about 5 minutes.

Serve with zested lemon wedges and Not Just Any A Humble Chef's Farinaceous Salad Made In the Style of the Germans

Serves 6.

Variation: you know, virtually every country in the world has a variation on this recipe. Ask your mom or grandma and I'm sure they can give a variation from their own country.

A Humble Chef's tip: these can be made in advance and refrigerated. However, do not allow them to touch other too much or they'll stick to each other. Then you'll have to peel one off the other.

MICROWAVE RICE

0 komentar

This is a handy little recipe for rice cooked in the microwave oven. It is easy, requires no "pot watching" and produces perfect rice.

2 cups boiling water
1 cup long grain white rice (not instant)

Mix everything in a heat safe glass or ceramic bowl and cook on high (uncovered) in your microwave for 10 minutes. Remove and fluff with a fork. Return to microwave and cook at 50% power for another 5 minutes. Fluff again with the fork. That's it!!

NOTE: All microwaves cook differently. If you have an underpowered microwave, you may have to cook it an extra minute on 50% power. If you have a super powerful microwave...maybe subtract a minute during the 50% stage.

NOTE: Add butter and favorite seasonings to rice AFTER it is cooked.

Copy and Pasty

0 komentar

I must start this new post by offering apologies to all readers of my blog for my long hiatus. Yeah, sorry about that. As my old Italian neighbour used to say, "Whatta goin to do?"

I have been very busy with cooking classes these passed few months and I would like to say thank you to all those who come to my classes and to the co-ordinators who book them. Very swell of you.

For me, what is more rewarding than anything else is when someone tells me about their successful attempts to use my recipes. Shucks. Truthfully, boosts to my fragile ego and an occasional pat on the back are always welcome in my books. Having said that, this is a recipe I recently did and even I was surprised on the positive outcome.

I've recently renewed my interest in pasty and it's origins. Not to be confused with pastry, pasty is when you take a pastry and fold over a filling and is then crimped. Very similar to empanadas. However, in the case of the empanada, the filling is usually cooked in advance. Pasties are often filled with root vegetables, onions, beef, whatever and then baked. I suppose if you put tomato sauce, mozzarella and maybe some pepperoni, you could pretty much call that pasty a calzone. Confusing. Yes the pastry is a little different, but essentially the same concept.

Not far from the pasty, is pot pie. However, many of you already know this, but the pot pie filling is cooked in advance and covered with pastry. There are different types of pastry you could use for pot pie (flaky, puff, choux, phyllo) but I like shortcrust. If you can remember 1:2 (1 part fat to 2 parts flour) you'll be fine. Not to be confused with my 1:1:4 recipe. 1 cup of flour, 1 cup of milk and 4 eggs. I wonder, can anyone guess what this ratio might be?

And to keep life easy, make the stew and put the pastry on top in the pot. I mean, if you want to make a pastry base and make an actual pie, be my guest. But I like to keep it simple silly.

Before I move on, I recently had a, um, discussion about the origin of the term Mulligatany. It means "Pepper Water" in Tamil. Millagu for Pepper and Thanni for water. It doesn't refer to some Irish town where it came from like someone in one of my classes argued. Sigh.

Christmas Leftover Mulligatawny Pot Pie

For the Pastry:

240 g A. P. Flour (2 ¼ Cups)
170 g Butter (¼ lb.)
125 ml Cold Water (½ Cup)
Pinch of Salt

For everything else:
170 g butter (¼ lb.)
100 g A.P. Flour (1 Cup)
1 Small Red Onion, finely diced
1/2 Celery Stalk, diced
1 Small Carrot, diced
1 Red Pepper, diced
1 Green Pepper, diced
1 Green or Yellow Zucchini, diced
3 Garlic Cloves, crushed
1 Whole Breast of Turkey or whatever leftovers you have
2 Bosc Pears, grated
2 Large Russet Potatoes, diced
3 l Chicken or Turkey Stock
1 Can of Cranberry Sauce
Drizzle of Oil
Pinches, of Tumeric, Cumin, Mild Curry Powder, Cayenne, Paprika, Thyme
2 Bay Leaves
2 Eggs, whipped
Salt and Pepper to Taste

Preheat oven to 400.

To make the pastry, combine the flour, salt and butter and crumble with your hands; the mixture should look dry. Add one third of the water and gently mix in. Add next third of water and continue. Add the remaining water and massage in; it should be just damp enough to mass together. Cover with plastic wrap and refrigerate for at least 1 hour or up 24 hours.

On a floured surface, roll out the dough into circle big enough to cover the top of your pot. Maybe make the crust about ¼ inch thick.

In a soup pot, heat oil on med-high heat. Add onion, celery and carrot and cook for one minute.Add blend of spices. Add peppers and garlic and cook for another. Add pears, zucchini and potatoes and cook for 5 minutes. Add flour and cook for 5 minutes.

Whisk in chicken stock until blended. Add turkey and bay leaves. Bring to a boil and let simmer. Adjust to seasonings.

Brush the rim of the pot with cold water. Carefully lay the pastry round over the top and crimp the edges to seal. Brush the pastry with some of the egg mixture and bake until golden brown, about 25 minutes. About 5 – 10 minutes resting time.

Serves 8 – 10.

A Humble Chef's tip: where to begin? How about, this? Be sure the chicken stock is cold when adding to the aromatic roux. Rememeber, cold liquids to a hot roux.

Variations: simple. Turkey Mulligatawny Empanadas.

Popular Posts

 
  • For Secret Recipe © 2012 | Designed by Rumah Dijual, in collaboration with Web Hosting , Blogger Templates and WP Themes