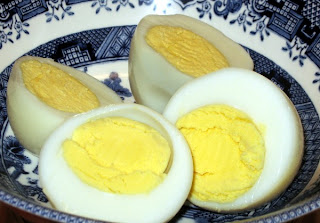
"HARD BOILED" EGGS FROM THE OVEN !!

0 komentar

There is nothing tricky about boiling eggs for Easter, but there are ALWAYS those eggs that crack as they boil, or the phone rings and you forget the eggs on the stove (and they overcook and  get those green "rings" around the yolks, etc.)  Not a big deal, but it can be a hassle when you are preparing for a crowd.

This oven method, of cooking eggs in the shell, is not only fool proof, but the eggs come out absolutely perfect and you can make a ba-jillion at once!!

Preheat your oven to 350 and place large size eggs in a mini-muffin pan (large end down). If you don't have a mini-muffin pan, you can use a regular cupcake pan  (they they will just roll around a little more).

How long you bake the eggs depends on the size of eggs you use and how hot your oven runs. I used large grade A eggs and cooked them for 25 minutes.  If you are concerned about it, just run a "test egg" to gauge how long to cook them.

When the eggs are done, use tongs to put the eggs into a bowl of ICE water (for 10 minutes) to stop further cooking.

NOTE: After the eggs are cooked, you MIGHT find SOME eggs that have brown speckles on them, but don't freak out; these little specks will dissolve when you put the eggs into the ice water. The next photo is before and after the ice water bath.

Not only is this a great way to cook Easter eggs in bulk, but the eggs are delicious!! The yolks are bright yellow and the whites are very tender (not rubbery like boiled eggs can produce).

Where has this cooking method been all my life!?!?

Easy Tasty Vegetable Biriyani

0 komentar


One of my favorite one pot meals is the biriyani, there are many versions however this is one of my favorite versions. It takes very little time and very easy to prepare. Hope you will enjoy preparing it too

Ingredients
  • 1 cup rice
  • 1 cup sliced onion
  • 1 cup tomato puree
  • 1/2 cup diced bellpepper
  • 1 cup diced paneer
  • 1/4 cup peas
  • 1/4 cup sweet corn kernels
  • 1 tbsp garlic ginger paste
  • 3 sliced green chillies
  • 2 tbsp chopped mint leaves
  • 3 tbsp chopped cilantro/coriander
  • 1/4 tsp turmeric powder
  • 1 tsp chilli powder
  • 1 tbsp shahi biryani masala
  • salt to taste
Procedure
Soak rice with 2 cups water for 1/2 hr. Add a tbsp of oil , 1/2 tsp salt to the soaked rice, pressure cook the rice with three whistles and 3 minutes in sim and switch it off.

Once it cools open pressure cooker and add 1 tsp ghee and keep aside.

In a deep bottom pan heat 2 tbsp oil and 1 tbsp ghee, add cummin seeds, onions and fry till onions turn translucent, add garlic ginger paste and tomato puree and fry till oil begins to saturate, now add all the veggies and mix nicely and add little water let it cook till it becomes tender.

Now add salt, green chillies, mint leaves, cilantro, red chilli powder,turmeric, shahi biriyani masala and mix nicely.Once oil begins to saturate add the cooked rice and mix gently with the veggies.

Fry the paneer with 1 tsp oil till golden brown and add to the rice. Serve hot with your choice of raitha.

BACON RISOTTO

0 komentar

There are huge "blind spots" in my cooking repertoire, like various herbs that I've never been introduced to, or spices that picky-picky husband refuses to eat and then there is always the financial restrictions that keep me from trying certain foods.

I'm not sure which of these categories risotto falls into (I've never even tasted it before today)  but I'm guessing that the $10 price tag for a 36 ounce jar of Arborio rice was part of the "hold up". I know I will be on a search for a more reasonable source, in the near future, for this specialty rice since we liked it so much.

This recipe came from allrecipes.com and it is absolutely delicious. I am really looking forward to reheating it for tomorrows lunch!!
1/2 pound bacon (fried, drained and crumbled)
5 cups chicken stock
2 tablespoons butter
1/2 onion, diced
4 cloves garlic, minced (see note)
1½ cups Arborio rice (do not use regular rice)
2 tablespoons butter
1/4 cup grated Parmesan cheese (not the powdered kind)
salt and pepper to taste

Bring the chicken stock to a boil in a sauce pan, over high heat; reduce the heat to low and keep the chicken stock hot.

Heat 2 tablespoons butter in a large, heavy bottomed saucepan over medium high heat.  Add the onion and garlic; cook and stir until the onion begins to turn golden brown at the edges, about 2 minutes. Add the rice and stir until it is coated in butter and has started to toast, about 2 or 3 minutes.

Reduce the heat to medium and stir in one third of the hot chicken stock; continue stirring until the rice has absorbed the liquid and turned creamy.

Repeat this process two more times, stirring constantly, which should take about 15-20 minutes total time. The rice should be tender but slightly firm when fully cooked.

Remove the risotto from the heat and stir in the remaining 2 tablespoons butter, the cheese and the crisp bacon. Season to taste with salt and pepper.

NOTE: As a first time risotto maker, I was nervous about making rice without using a lid on the pan, but it works great...just don't rush it.

NOTE: I wanted the bacon flavor to cook into the rice, so I put about half of the crisp bacon into the rice as it cooked, then mixed in the other half of the crisp bacon before serving. I will definitely do that again because it gave the rice a wonderful flavor.

NOTE: The recipe calls for four cloves of garlic, but that seems like a LOT. I didn't use any garlic because picky-picky is allergic to it.
These photos do not do this tasty side dish justice.

Delightful Rava Laddu

0 komentar


Happy Ugadi to all my blog friends.Today is the telugu new year day and I have been so busy with some personal work for the last couple of months and have not been able to blog. However I felt I should share a recipe that is easy and quick to make.

The rava laddu have a unique grainy flavor and a great companion filling you with a quick burst of energy.So here is the recipe

Ingredients
  • 1 cup rava (sooji/semolina)
  • 1 cup sugar
  • 1/4 cup grated coconut
  • 1/2 cup milk
  • 4 tbsp ghee
Procedure

In a deep bottom pan heat 2 tbsp ghee (clarified butter) and fry the rava till light golden brown. Keep aside

In the same pan heat 1 tbsp ghee and fry the coconut. Stir continuously till light golden brown and mix with the rava.

Heat 1 tbsp ghee and fry the cashewnuts till light golden brown then add the kishmish and fry kishmish till they become fluffy. Add to the rava mixture.

Take half cup sugar and grind it to powder and mix the granulated and powder sugar to the rava.

In a bowl mix half cup milk with half cup water and boil.Keep aside till it becomes warm.

Now in a big plate mix all the above ingredients nicely expect the warm milk.

Take a small palm size portion add milk little by little till it binds firmly into a nice laddu. Repeat the same for all the portions and enjoy your laddus.

TENDER SHRIMP

0 komentar

I don't know about you, but I've ruined a LOT of expensive shrimp over the years by not cooking it properly. In mere minutes, I have been known to turn $15 dollars worth of beautiful raw shrimp into a bowl of curly shrimp that have the mouth feel of an eraser...very frustrating!!

Not any more!! I have found the easiest, quickest, most fool proof and certainly most delicious way to cook raw shrimp. Where has this recipe been all these years!?!?!? Am I the only one who didn't know this trick?


A QUICK 30 MINUTE BRINE
1 cup cold water
2 cups ice (I just used an ice cube tray full)
1/4 cup kosher salt
1/4 cup white sugar

Mix the brine ingredients well, then add 1 to 1½ pounds of large size shrimp (roughly 25 shrimp to the pound) that have had the head and shells taken off and the vein removed (leave the tails on if you want).

Stir gently to make sure the brine reaches all of the shrimp evenly, then chill in the fridge for 30 minutes.

After 30 minutes, drain the shrimp and rinse well under cold running water.  Drain well for a few seconds and then completely blot dry with paper towels (put back in the fridge while you heat your oven).

Pre-heat a baking sheet under your BROILER (with nothing on the pan) for a full five minutes. While the pan is pre-heating, put the shrimp in a bowl and gently toss with a tablespoon of olive oil, making sure each shrimp is coated.

After the empty pan has pre-heated for five minutes, put the shrimp on the pan (they will sizzle) and separate them so they don't touch each other and  sprinkle lightly with Old Bay seasoning (we don't like that flavor, so I just used some black pepper) but don't add salt (there is enough salt from the brine) and quickly put it back under the broiler.

Broil (about 6" away from the flame) for 2 minutes, then flip the shrimp over, and broil for one more minute. Remove the shrimp, immediately, from the baking pan (or they will continue to cook and get rubbery).
Shrimp cooked with this method are extremely tender and flavorful. This is a great technique for ANY recipe that calls for pre-cooked shrimp and it will make cooking shrimp for a big family crowd a snap!!

Pâté Forestier au Genièvre

0 komentar

On a recent trip to Napa Valley my wife and I sampled some great champagne and nibbled on some of the countries most celebrated Charcuterie. I commented to her that I could make it at home and promised to do it when we returned home from our trip.

She absolutely loves the taste of truffles (who doesn't) so I decided that Pâté Forestier au Genièvre would be a good one to make for her. The keys to making a great Pâté starts with the quality of the ingredients, patience, and diligence of the person making it to follow a few simple rules.

Rule #1 - Cut your meat up into chunks, salt it lightly, and partially freeze it before grinding it. If you do this you will come out with a much better texture.

Rule #2 - Toast your spices in a pan and grind them fresh. If you do this the aromatic flavors will just pop in any recipe that you do.

Rule #3 - Make the mix a day ahead and let the flavors develop before assembling and cooking.

Rule #4 - Fry up a dab of the mix the next day and give it a taste to test your seasonings. If it doesn't taste right adjust the seasonings.

Rule #5 - Use a meat thermometer to make sure that you finish at around 160 degrees. You want to make sure that the Pâté is smooth and doesn't crumble. If the temperature is too high all the fat will leave and you will end up with a dry and crumbly terrine.

All the course ground Pâté I make has the same base recipe. The difference between most of them is simply the garnish or what I like to call the money shot. This is where you really get a chance to shine and make things stand out.

Pâté Forestier au Genièvre 

"Course Ground Meats"

1 lb 2 oz Pork Belly
1/4 lb Ground Pork
1/4 lb Ground Veal
1/8 lb Ground Pancetta 

"The Wrapper"

12 slices Prosciutto

"The Binder"

2 Diced Shallots
6 Fresh Garlic Cloves
1/2 cup Diced Onion
1/4 cup Cognac
4 Chicken Livers
2 tbsp Port
1/4 Cup heavy cream
1 Egg 

"The Spices"

1 tsp Ground Cloves
1 tbsp Juniper Berries
1 tsp Allspice
1 tsp Nutmeg
1 tsp Thyme
1 tsp Ginger
1 tsp Coriander Seed
1/2 Stick Cinnamon Bark

1 tbsp Course Ground Pepper
2 tbsp Kosher Salt
1 tsp Pink Salt 

"The Money Shot"

Truffle Salt
Mushrooms
Truffle Oil
1/2 cup toasted Walnuts
1 Tbsp Sherry

Cut the meat into chunks and partially freeze. Once meat is around 70% frozen grind it using the course blade.

Marinate chicken livers in cognac a minimum of three hours then combine in food processor with the garlic, shallots, onion, port, cream and egg to form the binder.

Toast Black Pepper, Juniper Berries, Coriander, Cinnamon Bark, and Cloves. Grind them fresh and combine with the Ginger, Nutmeg, Thyme, Salt, and Pink Salt to make the Pâté spice blend.

Combine the ground meat, binder, spices and blend together in a non reactive container. Refrigerate overnight to allow the flavors to blend together

(I like making a dozen small individual terrines every time I make up a batch of this. We eat a couple and them vacuum pack and freeze the rest. It is great to have something homemade and elegant like that in your freezer that you can thaw out quickly and serve to guests.)

The next day you want to toast up half a cup of walnuts in a pan and then chop them up.

Next you saute your mushrooms with a little olive oil. Finish with sherry and truffle salt. Once the mixture cools add truffle oil to build the flavor. Mix mushrooms and walnuts with the forcemeats.

Line twelve mini loaf pans with plastic cling wrap. Drape the slice prosciutto lengthwise in each pan. Fill each pan with the mixture and wrap up with the prosciutto.

Preheat the oven to 225 degrees. Place the loaf pans in a roasting pan and fill the roasting pan with boiling water until it reach half way up (water-bath) the mini loaf pans. Cover the roasting pan with foil and cook until the Pate reaches 135 degrees. At that point take off the foil and cook until it reaches a temperature of 160 degrees which allows the prosciutto to crisp up a bit.

Take it out of the oven and allow it to cool to room temperature. Take them out of the molds and remove any excess fat. Wrap tightly in cling wrap and refrigerate overnight while weighted down.


Sundae and Fondue Fever at Swensen's

0 komentar


The summer heat has finally drawn me out and into the cooler malls, with my room's air conditioning threatening to burst in flames with almost 20 hours of continuous use. Besides, a date with Alex composed of meals, a bit of shopping, and ice cream really sounds inviting. Why on earth I forgot to bring my camera still baffles me, so my Blackberry would have to do for now.


Nutty Crispy

APPLE-PUMPKIN LUNCH BOX MUFFINS

0 komentar

I just love a super moist muffin, don't you? I discovered this apple-pumpkin muffin recipe about 3 years ago and it is still one of our favorites. It is one of those great muffins that just keeps getting more and more moist (if they last that long). This recipe goes together quickly and easily and the muffins bake up with nice round tops covered with a sweet streusel topping.

This muffin is perfect for the lunch box or mid-day coffee break (recipe makes 18 muffins); they freeze well and a quick re-heat in the microwave gives you piping hot muffins that taste just like it came out of the oven. STORE BAKED MUFFINS COVERED.

2 ½ cups flour
2 cups white sugar
2 teaspoons cinnamon (see substitution note below)
½ teaspoon ground ginger
½ teaspoon ground nutmeg
1 teaspoon baking soda
½ teaspoon salt
2 eggs slightly beaten
(1) 15 ounce can of pumpkin
½ cup canola oil
2 cups cooking apples (peeled and chopped small)

Preheat oven to 350°. In large bowl, mix dry ingredients until well mixed, set aside. In another bowl, beat eggs slightly then add pumpkin and vegetable oil - whisk until smooth. Stir in 2 cups of chopped apples. Add pumpkin-apple mixture to dry mixture and blend thoroughly. Spoon batter equally into paper lined cupcake pans. Top with streusel topping (recipe below) and bake for 35-40 minutes at 350°. Muffins are done when toothpick inserted in center comes out clean.

STREUSEL TOPPING
2 tablespoons flour
¼ cup white sugar
½ teaspoon cinnamon
4 teaspoons melted butter

Mix streusel ingredients with your fingers until you get a dry crumbly topping. Put a little on each muffin before you bake.

NOTE: You can substitute 1 tablespoon pumpkin pie spice for the cinnamon-ginger-nutmeg combination.

NOTE: Let muffins cool down a little, but before they are entirely cold, cover with plastic wrap. Muffins should be stored covered.

NOTE: Recipe says to bake for 35-40 minutes. My oven cooked these in 35 minutes exactly.

PEANUT BUTTER BARS

0 komentar

Today's post is a Peanut Butter Bar that I've been making since my kids were little. It has a sweet oatmeal base... a cream filling of sweetened condensed milk mixed with peanut butter and finally a topping of sweet oatmeal with chocolate chips. It is SO good, it travels well and it is perfect for bake sales or pot lucks, etc. It is a great recipe to have in your files.
2 cups raw quick oats
1¾ cups brown sugar
1½ cups all purpose flour
1 teaspoon baking powder
½ teaspoon baking soda
1 cup butter
2 cups chocolate chips (see note)
1 beaten egg
14 ounce can sweetened condensed milk (not evaporated)
1/3 cup creamy peanut butter

Combine the first 5 ingredients in a large bowl and then cut in the butter (like you would for a pie crust). You can do this step by hand or with a stand mixer, but don't do it with a food processor because it will chop the oatmeal to finely.

Remove 1¾ cups of these crumbs and put them in a small bowl, add the chocolate chips and set aside.

Mix the beaten egg into the remaining crumb mixture (not the part with the chocolate chips) and mix well.  Press into a greased (or Pammed) 10" x 15" x 2" baking pan and bake in preheated oven for 15 minutes.

While the base is in the oven, whisk the sweetened condensed milk together with the creamy peanut butter and set aside.

When the partially baked crust comes out of the oven, drizzle the milk-peanut butter mixture evenly over the crust. Top with the reserved crumb-chocolate chip  mixture.

Bake at 350 for another 15 minutes.  Cool completely in the pan before cutting into squares.

NOTE: Use any type/flavor chocolate chips that you like. I usually use a mixture of semi-sweet and Reece's peanut butter chips. Today's post has semi-sweet chocolate chips and mini-Reece's pieces.

Popular Posts

 
  • For Secret Recipe © 2012 | Designed by Rumah Dijual, in collaboration with Web Hosting , Blogger Templates and WP Themes