Showing posts with label SIDE DISHES. Show all posts

SLOW COOKER VEGGIES AU GRATIN

Whether it's too hot too cook indoors, or I'm just having a lazy day, I'm always on the look out for easy side dishes that I can throw into the slow cooker in the morning and enjoy when we grill in the evening or afternoon.  This recipe is one of those versatile ones that you can really put just about any veggies in it your family likes. 

Today, I went with small cubed potatoes, carrots, corn, broccoli, green beans, peas (and a little bacon).  I put the potatoes and carrots into the food processor and chopped them to a small dice so they would cook quicker, but you can slice them too.  Do not precook any veggies.

5 medium potatoes  small diced
1-2 large carrots peeled and small diced
2 cups of favorite veggies  diced if necessary
3 tablespoons flour
3 tablespoons butter
1 teaspoon salt
1/4 teaspoon black pepper
2 cups milk
1½ cups sharp chedder cheese grated
1/4 pound of bacon fried crisp and crumbled

Slice or dice the potatoes and carrots about the same size. Add 2 cups of your favorite veggies. In a pinch I use frozen mixed veggies, but in the summer, I like to use fresh veggies.

In a saucepan with a heavy bottom, melt the butter, then whisk in the flour, salt and pepper. Cook this for about a minute to cook out any raw flour taste. 

Whisk like crazy while you add 2 cups of milk. Once you get the milk in, add the crumbled bacon and bring to a boil (if you add the cooked bacon at this stage, it will flavor ALL of the sauce. Stir while it comes to a full boil (it will get thicker). Remove from heat and stir in the grated cheese.

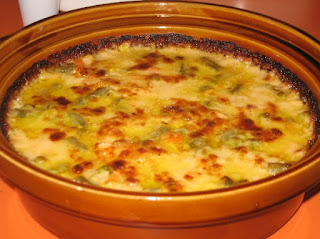
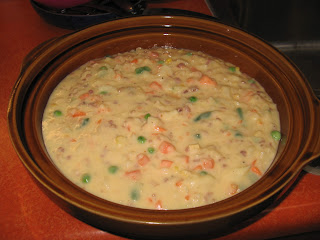
Once the cheese is melted, stir it into the potato-veggie mixture. Grease the bottom and sides of your slow cooker and pour the mixture in.


Depending on what kind of slow cooker you have and how large you sliced/diced your veggies, it will take about 3-4 hours on low or 2 to 3 hours on high.  I apologize for not being more specific, but I have several different kinds of crock pots and they ALL cook at different speeds, so it's hard to tell you exactly how long it should be in there.  Taste testing is probably your best guide the first time you make this.


This is one of those recipes that doesn't look like  much in the photos,
but tastes awesome.

NOTE: Mild or medium cheddar is very bland in this recipe, so I suggest a good sharp cheddar. Half sharp cheddar and half swiss is also good.

BRIGHT SUMMER SALAD

0 komentar

In the heat of summer, this great salad is a nutritious combination of crunch (from the broccoli and sunflower seeds) and sweetness (from the oranges and raisins).  It gets its brightness from the lemon juice, green onions and red bell pepper and finally the addition of the black beans give you that wonderful "full feeling" that you do not get with some light meals. This is a GREAT side dish!! Measurements given here are approximate (except for the dressing). YOU decide how much of each ingredient you would like in your salad. The amounts given here are catered to MY taste buds. 


3 small heads of broccoli (broken into small pieces)
1 red bell pepper (diced finely)
1 cup raisins
2 oranges (peeled and sliced thickly)
15 ounce can of black beans (rinsed and drained)
1/2 cup  toasted sunflower seeds
1/2 cup sliced green onion tops

Dressing:
1/2 cup light mayonnaise
2 tablespoons fresh lemon juice
2 tablespoons sugar
1/4 teaspoon black pepper


Wash (and shake dry) the broccoli. Remove as much of the stalk and stems as you can so you can break the florets into bite size pieces. Add diced red bell pepper, raisins, oranges, black beans, sunflower seeds and green onions.

Mix dressing ingredients with a whisk and pour dressing over the salad. Toss gently and serve immediately. NOTE: You may not need or want all of the dressing.


NOTE: Peel the oranges, removing as much of the white as you can, then slice the orange into thick slices; cut the thick slices into four wedges.

NOTE: Let your imagination go wild with this salad, you can add just about anything that strikes your fancy.

CROCKPOT PICNIC BEANS

I love beans of all kinds, baked beans, chili beans, bean soup, refried beans, you name it; so I've tried a lot of bean recipes.  As usual, I ended up taking the best part of several recipes and combining them to create this crockpot picnic bean recipe. Every BBQ needs a big pot of beans !!

These beans are slightly sweet and smokey, not to mention VERY flavorful and an inexpensive (and nutritious) way to feed a crowd. The trick is to start them the day ahead, then let them cook in the crockpot all day (or overnight). Your kitchen will smell heavenly.

3 cups DRY navy beans  (soaked overnight)
3/4 cup tomato puree
3/4 cut ketchup
2½ cups (bean) water   (see note)
1/4 cup molasses
1/2 cup brown sugar
2 teaspoons DRY mustard powder
1 medium onion chopped
3 teaspoons salt
1/2 pound of bacon (fried and crumbled)

Rinse and sort the dry beans (sometimes, there are tiny rocks or pieces of dirt in the bag). Cover them with water (about 3" above the beans) and put them in the fridge for about 8 hours or overnight.  Drain and rinse them again.

Put the beans in a large kettle and cover with with enough water to measure  3-4 inches above the beans. Gently boil  for 1 to 2 hours (all beans cook at different rates, so just test for doneness after an hour ...just don't let them get mushy). If you want to skip this step, see alternative method below.

Drain  the beans, but reserve 2½ cups of the bean water. Put the drained beans, onion and crumbled bacon in the crockpot. 

Mix the 2½ cups of bean water with the tomato puree, ketchup, molasses, sugar, dry mustard, and salt until smooth then pour over the beans, stirring very gently to distribute everything.

Cover and cook on low setting of your crockpot for about 8 hours. Don't be afraid to add a little water towards the end if it looks like it needs it (it won't effect the taste).

NOTE: If you don't want to mess with boiling the beans, you can soak them all day and then before you go to bed, put the beans in the crockpot, cover them with water (water only) and let them cook on low all night.   In the morning, drain the beans (saving 2½ cups of the bean water) and then  proceed with the rest of the recipe.

NOTE: Navy beans work the best for this recipe, but northern beans or any small white DRY bean will work, just don't use a dry lima bean...they get mushy too fast.

NOTE:  "Bean water" is simply the water that you boiled the beans in.

MACARONI SALAD and DRY RUB BLEND

0 komentar

Everyone seems to have their own tried and true family macaroni or potato salad recipe. Some have lots of vinegar, some have lots of mustard, some have no eggs (yee gads!!) I even had some that had small cubes of sharp Cheddar cheese which was surprisingly tasty.

I remember when I was little, my folks took us back to visit our VERY German relatives in the Dakota's and one of my Aunts gave me some German potato salad. I was a huge fan of potato salad, but let me tell you that hers was not like any other potato salad I had ever tasted. It was not only FULL of vinegar and bacon grease, but it was HOT!! It's been over 50 years but I still can remember my shock!!  lol

What do you put in YOUR macaroni (potato) salad?


2 cups dry small seashell macaroni
½ cup chopped onion chopped (fairly fine)
3 stalks of celery with leaves chopped (fairly fine)
½ cup red bell pepper chopped (optional)
1 cup grated carrot
3 large pickles chopped (favorite flavor)
4 hard-boiled eggs chopped
½ teaspoon black pepper
1 cup lite mayonnaise
3 tablespoons yellow prepared mustard
3 tablespoons pickle juice

Boil macaroni for 8 minutes (or as recommended on box), then rinse under cold water, and drain very well.

NOTE: Many recipes warn you not to rinse cooked macaroni, however, I find that macaroni salad stays creamier if you rinse the starch off of the cooked macaroni before you add the mayonnaise to the salad.

Add chopped veggies, eggs and pickles to the cooked and rinsed macaroni. Whisk the mayonnaise, mustard, pepper and pickle juice together and gently stir into the macaroni-veggies.

IMPORTANT: This salad really needs to sit in the refrigerator overnight so the flavors can blend together…it makes a huge difference.

NOTE: I do not add salt to this salad because there is already a lot of salt in the pickles, pickle juice and mustard.

NOTE: Just before I put this salad into the fridge, for the first time, I put a piece of wax paper (or plastic wrap) on the surface of the salad and then I lay 2 paper towels (folded) on top of the wax paper and snap the Tupperware lid on. The paper towel will attract any condensation in the bowl and the waxed paper (or plastic wrap) will keep the moisture from running down into the salad. Once the salad is in the fridge overnight, discard the wax paper and paper towel.

NOTE: The amount of mayonnaise you use is up to you. Start with 1 cup and add more if you like your salad creamier.

If you are looking for a new dry rub recipe, I hope you will try this one. At first glance it may look like it is too sweet, but the final taste is just excellent.

It's great for pork and chicken, just mix it up and rub it onto your raw meat about 20 minutes before grilling...Yummmm!!!

3/4 cup white sugar
3/4 cup brown sugar
1/4 cup salt
1 teaspoon onion powder (not onion salt)
2 Tablespoons coarse ground pepper (I used 1 tablespoon)
pinch of cayenne pepper (or to taste)
2 tablespoons paprika

Mix well and keep in jar with a tight lid.

INDIVIDUAL YORKSHIRE PUDDINGS

On VERY special occasions, my British mother used to make roast beef with Yorkshire pudding. She baked the pudding in a 9" x 9" pan and I can still picture the huge golden "puff" coming out of the oven. Of course, it always collapsed by the time she brought it to the table, but we all thought it was SUPPOSED to look like that and we eagerly dunked chunks of the tasty treat into mom's deliciously perfect beef gravy; Mmmmmm, I can still taste it.

Recently, I decided to make a couple of changes to my Yorkshire pudding recipe. First, I made them into individual puddings and secondly, I decided to serve them with roast chicken and gravy, so I added a little poultry seasoning and onion powder  into the batter; what a nostalgic treat!!

 This recipe is fool proof as long as you follow it closely.

The cooking times for these individual Yorkshire puddings work well if you bake them in one of those over-sized cupcake pans, I believe they are called Texas size muffin pans; a popover pan will work well also. If you use a standard cupcake pan, you'll have to reduce the cooking time.

Put your UNGREASED pan in a COLD oven and then preheat the oven and pan to 425.

While your oven/pan is preheating, whisk together:

3 eggs
¼ teaspoon salt
¼ teaspoon onion powder (not onion salt)
½ teaspoon poultry seasoning  (if you use chicken gravy)
1 cup of milk (see note)
1 tablespoon melted butter

NOTE: If I have whipping cream, I put about ¼ cup of whipping cream in a measuring cup and then fill the rest of the way with 2% milk...if I have no cream on hand, I just use 1 cup of 2% milk.

After the above ingredients are whisked together well, add one cup of all purpose flour (spoon flour into measuring measuring cup and level off with straight edge). Whisk everything together until it looks very smooth and creamy. Let batter sit at room temperature while your oven preheats.

Working quickly (so your pan doesn't cool off) take your pan out of the hot oven and spray each cup with vegetable spray. Put a small chunk of COLD butter (roughly ½ teaspoon but the exact size is not crucial) (see note below) into the bottom of each hot cup (don't wait for it to melt). Fill each cup half way full.

Bake at 425 for 20 minutes. After 20 minutes, turn the oven down to 325 (don't open the oven door) and bake for another 15 minutes. Remove puddings from pan and poke a tiny hole (I use a toothpick) in the bottom of each popover to relieve a little steam (not totally necessary if you are going to eat them right away).

The inside of the Yorkshire pudding is full of light batter with holes, which is perfect for holding butter and gravy.

NOTE: Traditionally, you are supposed to pour the batter over hot beef fat  in the bottom of each muffin cup, however, I couldn't bring myself to do that (and besides I was serving them with chicken), so I used butter and it works great.

NOTE: If you are serving these with roast beef, omit the poultry seasoning and add whatever seasoning you like.

NOTE: This recipe makes six generous Yorkshire puddings.

VEGGIE SIDE SALAD

0 komentar

We still have a lot of snow around the edges of the yard (several feet of it as a matter of fact), but it won't be long before it's barbecue season again, so my thoughts are turning towards side dishes that can be prepared ahead of time. 


Summer Pea Salad, jazzed up with crisp bacon and tomatoes is one of my favorites. It is one of those great salads that travels well and tastes even better after it has been in the fridge for a day or two. If you are going to make this salad, in advance, don't add the crisp bacon right away (it will get soggy), just sprinkle it over the salad before serving.
16 ounce bag of frozen green peas
1/3 cup finely chopped red onion
1/2 cup grated carrot
1/2 cup celery chopped
1 cup thinly sliced mushrooms
1/2 cup red bell pepper chopped
3 slices of crisp bacon cut up
1/2 cup sharp cheddar cheese shredded (I use more)
cherry tomatoes, cut in half
sunflower seeds

Fresh green peas are the best in this salad, but when they are not available, frozen peas work very well too.  Microwave peas (covered) with 1 tablespoon of water for about 3 minutes or until slightly cooked (but not soft) then drain and cool.


In a large bowl, mix all of the above ingredients together (except the cherry tomatoes); gently fold in the dressing.


Dressing
3 heaping tablespoons of light mayonnaise
1 tablespoon freshly squeezed lemon juice
2 teaspoons sugar
1/2 teaspoon black pepper
1-2 tablespoons milk
Whisk the ingredients together and gently fold into salad.


Add cherry tomatoes and an extra sprinkle of cheese to the top of the salad for decoration. Cover and chill.
NOTE: Every microwave cooks at a different rate, so keep an eye on your peas when you microwave them. You don't want them to get overcooked and mushy.

BACON RISOTTO

0 komentar

There are huge "blind spots" in my cooking repertoire, like various herbs that I've never been introduced to, or spices that picky-picky husband refuses to eat and then there is always the financial restrictions that keep me from trying certain foods.

I'm not sure which of these categories risotto falls into (I've never even tasted it before today)  but I'm guessing that the $10 price tag for a 36 ounce jar of Arborio rice was part of the "hold up". I know I will be on a search for a more reasonable source, in the near future, for this specialty rice since we liked it so much.

This recipe came from allrecipes.com and it is absolutely delicious. I am really looking forward to reheating it for tomorrows lunch!!
1/2 pound bacon (fried, drained and crumbled)
5 cups chicken stock
2 tablespoons butter
1/2 onion, diced
4 cloves garlic, minced (see note)
1½ cups Arborio rice (do not use regular rice)
2 tablespoons butter
1/4 cup grated Parmesan cheese (not the powdered kind)
salt and pepper to taste

Bring the chicken stock to a boil in a sauce pan, over high heat; reduce the heat to low and keep the chicken stock hot.

Heat 2 tablespoons butter in a large, heavy bottomed saucepan over medium high heat.  Add the onion and garlic; cook and stir until the onion begins to turn golden brown at the edges, about 2 minutes. Add the rice and stir until it is coated in butter and has started to toast, about 2 or 3 minutes.

Reduce the heat to medium and stir in one third of the hot chicken stock; continue stirring until the rice has absorbed the liquid and turned creamy.

Repeat this process two more times, stirring constantly, which should take about 15-20 minutes total time. The rice should be tender but slightly firm when fully cooked.

Remove the risotto from the heat and stir in the remaining 2 tablespoons butter, the cheese and the crisp bacon. Season to taste with salt and pepper.

NOTE: As a first time risotto maker, I was nervous about making rice without using a lid on the pan, but it works great...just don't rush it.

NOTE: I wanted the bacon flavor to cook into the rice, so I put about half of the crisp bacon into the rice as it cooked, then mixed in the other half of the crisp bacon before serving. I will definitely do that again because it gave the rice a wonderful flavor.

NOTE: The recipe calls for four cloves of garlic, but that seems like a LOT. I didn't use any garlic because picky-picky is allergic to it.
These photos do not do this tasty side dish justice.

INDIVIDUAL POTATOES AU GRATIN

0 komentar

Whether you are "empty nesters", newly weds or single, this scaled down recipe is easy, tasty and reheats well too!! The ingredients listed below make six individual au gratins. We found that two of these were perfect for each adult, but the recipe can easily be doubled or tripled.

2 large russet potatoes
1/2 cup grated Colby Jack cheese
1/2 tsp. salt
1/4 tsp. pepper
2 tablespoons heavy cream (per portion)
1/2 cup finely chopped ham or crisp bacon

Peel the potatoes and put them in the food processor along with the ham (or bacon). Pulse the potatoes and ham just until you get pieces about the same size as medium hashbrown chunks. Remove from the food processor and stir in the cheese and salt and pepper.


Spray your cupcake pan with cooking spray and fill each section to the top (patting down VERY lightly). Pour 2 full tablespoons heavy cream over each portion. Cover with foil and bake at 375 for 40 minutes (take the foil off the last two or three minutes and put under the broiler to give them some color).

Remove from oven and let them sit for about 5 minutes before lifting them out of the pan with a large spoon.


These are deliciously creamy, cheesy and "ham-y"; they will go with almost anything. Recipe makes six portions. One portion is perfect for children, but adults can easily eat two portions.

IMPORTANT: If you are using a standard cupcake tin, put a baking sheet under the pan because the cream tends to bubble up a little during cooking.

SWEET & SAVORY RICE

0 komentar

I'm the kind of person who likes lots of "extra stuff" in my rice; Picky-Picky Hubby is not. He likes plain white rice...period!! So, when I created this dish, I designed it for ME...rice, apples, golden raisins, toasted pecans...yum. You can imagine my shock when Hubby (with cheeks packed full) exclaimed "this is excellent!!" I almost fell off of my chair!!
.
2 ¼ cups chicken broth
1 tablespoon butter
1 cup raw white rice
½ teaspoon onion powder
½ teaspoon salt
¼ teaspoon black pepper
1 teaspoon ground cumin
1 large cooking apple
1/3 cup dark brown sugar
1/3 cup golden raisins
½ cup chopped toasted pecans
.
Peel and chop the apple into small bite-size pieces. Place everything (except the pecans) in a medium size saucepan and bring it to a boil. Turn down the heat to a low simmer and put a tight fitting lid on the pan. Simmer for 20 minutes. Remove from heat and quickly stir in the toasted pecans. Put the lid back on and let it sit for another five minutes.
.
That's it!! The dark brown sugar and fruit lend a mildly sweet flavor to the rice and the ground cumin gives the flavor a little depth. This is a great side dish for chicken, ham, etc. and it would make an excellent buffet dish since it stays warm and tastes great at room temperature. I hope you will try it.

NOTE: I first posted this about a year ago. Since then it has become one of our favorite side dishes for outdoor grilled meat, it seems to go with just about everything.

NO FAIL HASHBROWNS FOR THIS WEEKEND

0 komentar

This hash brown recipe is fool proof. It will give you crisp potato patties, just begging for a dash of hot sauce (or ketchup for the kids). The following instructions are for pattys, but you can also spread the mixture out in a big frying pan, then cut into wedges for serving.

3 cups Simply Potatoes (see note below)
¼ cup very thinly sliced green onions
(optional)
1/3 cup all purpose flour
1 egg
(lightly beaten)
1½ teaspoons salt
(or to taste)
¼ teaspoon black pepper
(or to taste)
I use (the shredded hash brown style of) a product called Simply Potatoes (in my store they are sold in the refrigerated section above the eggs), but you can use THAWED Ore Ida shredded (loose) hash browns as well. I have tried fresh potatoes for this recipe and they do NOT work as well as Simply Potatoes or thawed Ore Ida shredded potatoes (fresh potatoes get mushy).
Gently toss the potatoes with the flour, salt and pepper (and onion if you are using it), then gently (I use my hands) mix in the lightly beaten egg. NOTE: I mix the salt & pepper into the egg to make sure the spices are distributed evenly throughout the potatoes.
Pre-heat your heavy frying pan to medium high and brush your skillet with a generous coating of vegetable oil (I like to use my electric frying pan).

Place 1/3 (lightly packed) potato mixture onto HOT, greased frying pan and then gently flatten the mound with your spatula, like this: Fry patties for 4 minutes, per side, or until they are golden brown and crispy.
Drain on paper towels, sprinkle with salt and serve immediately.
I love how these hash brown patties hold together, you can even pick them up and eat them like a commercial hash brown patty, but oh so much better tasting.

NOTE: 3 cups of THAWED Simply Potatoes or Ora Ida equal about a pound.

RED RICE

0 komentar

I am on a never ending search for good side dishes. This is one of my favorite "go to" recipes for seasoned rice. It is FULL of flavor and goes well with just about any choice of meat dish. It is especially handy for a potluck or buffet since it can easily be doubled/tripled and remains tasty at room temperature. We take this with us (already cooked) when we go camping, since it reheats nicely and really "rounds out" those campfire masterpieces Hubby grills. 1 cup raw white rice (not instant rice)
2 tablespoons canola oil
½ cup chopped onion
2 teaspoons chili powder
1 teaspoon ground cumin
½ teaspoon dried oregano
1 teaspoon salt
¼ teaspoon black pepper
15 oz. can diced tomatoes in juice
1 tomato can of water + ½ cup
1 red bell pepper chopped
1 cup red kidney beans

Heat the canola oil, then add the raw rice, onion and spices. Saute this mixture until the onion is transparent and the rice is opaque. Add the red bell pepper, kidney beans, the whole can of diced tomatoes (plus the juice) plus 1 full can of water and another ½ cup of water. Stir well and bring to a boil.

Put a tight fitting lid on the pan and turn the heat down to a slow simmer. Cook for 20 minutes, then turn off heat and let sit for 5 minutes. Fluff with a fork and serve.
NOTE: "Toasting" the spices in the oil/raw rice mixture at the beginning of this recipe really "wakes up" the spices and helps the flavor get deep into the rice.

THE ULTIMATE POPOVER

0 komentar

I have been playing around with popover recipes for a while now, so I thought I would "get serious" and buy a popover pan. The pan makes a huge difference, not so much in the taste, but in appearance and how big the air bubbles are inside of the popover. These popovers could not be easier or cheaper to make, and they are such a treat, hot out of the oven with honey butter or strawberry jam!! If you do not have a popover pan, see note at the end of this post.

This recipe is fool proof as long as you follow it closely. Preheat your oven to 425 degrees. I put my popover pan in the oven while it preheats (do not grease before you preheat).
While your oven/pan is preheating, whisk together:
3 eggs
¼ teaspoon salt
1 teaspoon vanilla
1 cup of milk (see note)1 tablespoon melted butter

NOTE: If I have whipping cream, I put about ¼ cup of whipping cream in a measuring cup and then fill the rest of the way with 2% milk...if I have no cream on hand, I just use 1 cup of 2% milk).

After the above ingredients are whisked together well, add one cup of all purpose flour (spoon flour into measuring measuring cup and level off with straight edge). Whisk
everything together for about 30 seconds or until it looks very smooth & creamy.

Take the popover pan out of the hot oven and spray each cup with vegetable spray. Put a small chunk of chilled butter (roughly ½ teaspoon but the exact size is not crucial) into the bottom of each hot cup. Fill each cup half way full (makes six big popovers).

Bake popovers at 425 for 20 minutes. After 20 minutes, turn the oven down to 325 and bake for another 15 minutes. Remove popovers from pan and poke a tiny hole (I use a toothpick) in the bottom of each popover to relieve a little steam (not totally necessary if you are going to eat them right away).


NOTE: If you do not have a popover pan, you can use 6 ounce (oven safe) custard cups (I used the clear Pyrex ones, for a long time, with great success). I placed them all on a cookie sheet for easier handling. The popovers will not get quite as tall (as they do with a popover pan) but they taste every bit as good.

Someone from outside the USA wrote and asked me what a popover pan was, so here is a photo. As you can see, it is almost like a cupcake pan, but the cups are a lot deeper and spaced far apart so the hot air can circulate around each cup.

MICROWAVE RICE

0 komentar

This is a handy little recipe for rice cooked in the microwave oven. It is easy, requires no "pot watching" and produces perfect rice.

2 cups boiling water
1 cup long grain white rice (not instant)

Mix everything in a heat safe glass or ceramic bowl and cook on high (uncovered) in your microwave for 10 minutes. Remove and fluff with a fork. Return to microwave and cook at 50% power for another 5 minutes. Fluff again with the fork. That's it!!

NOTE: All microwaves cook differently. If you have an underpowered microwave, you may have to cook it an extra minute on 50% power. If you have a super powerful microwave...maybe subtract a minute during the 50% stage.

NOTE: Add butter and favorite seasonings to rice AFTER it is cooked.

GREEN BEAN-MUSHROOM-BACON & CHEESE CASSEROLE

0 komentar

The traditional "green bean casserole" has always intrigued me. I see it mostly during the holidays and I want to enjoy it, although I'm not too fond of the mushroom soup sauce it usually has. This year, I set out to re-invent this holiday casserole and I absolutely love the final results.
.
I used fresh green beans, sauteed sweet onions, portobello mushrooms, crisp bacon, a little cheddar cheese and my own white sauce. The resulting "green bean casserole" was delicious and we ate a ton of it. 1 pound of fresh green beans cut into 2" pieces
½ cup chopped sweet onion
½ pound of baby portobello mushrooms sliced
½ pound of bacon fried crisp (drained well & crumbled)
1 cup shredded cheddar cheese (loosely packed)
1 clove garlic minced finely
3 tablespoons white flour
1 teaspoon salt
scant ½ teaspoon black pepper
2½ cups milk
2 tablespoons butter

In a large frying pan, melt the butter and saute the chopped onions until they smell sweet; add the garlic and saute until it barely turns golden. Add the green beans and mushrooms (mixing well) and saute for a few minutes until they start to wilt just a little (don't cook them all the way through). Remove pan from heat and set aside.
.
In a sauce pan, melt 3 tablespoons butter. When butter is hot, add (all at once) the flour, salt & pepper, stirring quickly. Cook on medium for about a minute (to remove any flour taste). Next, you are going to add the milk, a little at a time, whisking like a mad woman while you add the milk (this will eliminate lumps in the sauce). Once the milk and butter-flour mixture are mixed well, cook on medium heat (stirring every once in a while) until it gets nice and thick.

Remove from heat and stir in the cheese & crisp bacon. Add this mixture to the vegetables and stir well (but gently). Place in an lightly greased casserole dish and bake at 350 for about 30 minutes or until very hot.
.
It was really tasty and the leftovers made a mouth watering lunch the next day.

TOASTED ORZO with PARMESAN & BASIL

0 komentar

This simple (and versatile) little side dish is just delightful. The orzo is toasted in butter before boiling, which adds an extra flavor, then it is tossed with Parmesan and fresh basil. Whether you use it as a side dish or a main dish, it is a very nice change.2 tablespoons butter
1 cup uncooked orzo pasta
2¼ cups chicken broth
½ cup grated Parmesan cheese
¼ cup thinly sliced fresh basil
½ teaspoon salt
¼ teaspoon black pepper
pinch of red pepper flakes
.
Melt the butter in a heavy bottomed pan that has a tight fitting lid. Add the UNCOOKED orzo pasta and stir until completely coated with the butter. Cook on medium-high until the pasta turns golden to lightly brown (watch it because once it starts to turn, it turns quickly).
.
Stir in the chicken broth, red pepper lakes, salt and pepper and bring to a boil. Cover and reduce heat to a simmer. Simmer until the orzo is tender and liquid is (almost) all absorbed. This will take 15 to 20 minutes depending on how fast your simmer is.
.
When orzo is tender, remove from heat and stir in Parmesan cheese and fresh basil. Serve hot.
.
NOTE: Just about anything can be added to this recipe, next time I think I'll include a little crisp bacon & some mushrooms!!!

SWEET POTATOES FOR TWO

0 komentar

This was a hard side dish to photograph. You'll just have to trust me, that it is delicious. We get very tired of the same old baked potato or scoop of rice, so this was an excellent change of pace.
. .
Whipped sweet potatoes, sweetened with brown sugar, butter and vanilla, then baked with a crunchy brown sugared pecan topping. Even my ultra-picky Hubby loved this one.
Don't go by the photo, it tastes great!!
1 cup of mashed sweet potatoes
2 tablespoons brown sugar
¼ teaspoon salt
2 tablespoons milk
2 tablespoons beaten egg*
1 tablespoon melted butter
¼ teaspoon vanilla extract

Whip everything with an electric mixer until smooth. Place in a 3 cup (greased) baking dish and top with the following topping. Bake at 350 for 25 - 30 minutes or until hot.

TOPPING
4 tablespoons chopped pecans
2 tablespoons brown sugar
1 tablespoon white flour
1 tablespoon butter
.
Mix topping ingredients (fingers work best) and spread evenly on top of sweet potatoes before baking.

NOTE: I had reservations about the pecans, but they are a wonderful addition to the dish. They are sweet, tender and crunchy and a nice contrast to the soft potatoes, I highly recommend you add them.
.
NOTE: Recipe calls for two tablespoons of egg. I just put an egg in a cup and mixed it well with a fork, then measured out the amount.
.
NOTE: This recipe makes two large servings. If you want more servings, just multiply the ingredients. It's pretty fool proof.

Popular Posts

 
  • For Secret Recipe © 2012 | Designed by Rumah Dijual, in collaboration with Web Hosting , Blogger Templates and WP Themes