Showing posts with label DESSERTS FOR TWO. Show all posts

LEMON MERINGUE PIE FOR TWO

0 komentar

Whether you are empty nesters, like us, or you only have a couple of people to cook for; "recipes for two" are great!! Not only do they eliminate the temptation for 2nd third helpings, but they are excellent for those times when you don't feel like eating the same full size dessert all week!! This recipe makes two perfect (single serving size) lemon meringue pies, one of picky-picky husbands favorites.

CRUST
1/3 cup all purpose flour
1/8 teaspoon salt
1 tablespoon  cold shortening (I use butter flavored)
1 tablespoon cold butter
1/2 teaspoon white sugar
1 tablespoon cold water

Mix all of the dry ingredients in a small bowl; cut the cold shortening and butter into the dry ingredients until it is about "half of a pea" size. Stir in the cold water and mix into a ball (don't over work). Divide dough in half.

Any small oven proof dish will work for these little pies; I used my 10 ounce Pyrex custard cups.  Press the dough into the bottom and about half way up the sides of the custard cup. You can roll out the dough if you like, but I find it easier to just press the dough into place. Bake in preheated 425 oven for about 10 minutes or until light golden. Remove from oven and set aside.

LEMON FILLING
1/3 cup granulated sugar
1 tablespoon corn starch
1/8 teaspoon salt
1/2 cup cold water
1 egg yolk, lightly beaten with fork   (save the egg white)
2 tablespoons FRESH lemon juice
1 tablespoon butter

In a small, heavy bottom, saucepan, mix the sugar, cornstarch and salt; whisk in the cold water,  until it is smooth.  Cook (stirring) on medium heat until thick and bubbly, then reduce heat and cook (and stir) for 2 minutes.

Slowly drizzle about half of the hot mixture into the beaten egg yolk (whisking like crazy as you drizzle, so you don't get scrambled eggs). Once well whisked, put it all back into the saucepan and cook 2 more minutes at a gentle boil.

Remove from heat and add butter and lemon juice; mix thoroughly and pour into baked pie shells.

MERINGUE
1 egg white
1/8 teaspoon cream of tartar
2 tablespoons sugar
1/2 teaspoon vanilla extract

Using a GLASS bowl (never use plastic when whipping egg whites) and beaters that are totally free from any grease or oil; beat egg white and cream of tartar until you get soft peaks. Sprinkle in the vanilla and sugar (while the mixer is still running) and continue beating until you get stiff peaks.

Spread meringue onto hot filling. Put back into a preheated 350 oven for about 10-15 minutes or until the peaks of the meringue are golden.
After the meringue is cooked, let these little pies sit at room temperature for about an hour then chill them for at least 2 hours before serving. Once they are chilled, you can lift the pies out of their baking dish for a prettier presentation.

Butterscotch Bread Pudding for Two

0 komentar

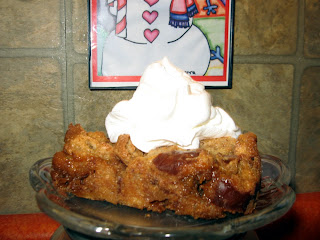
Bread pudding is one of those comfort food desserts and usually starts with a recipe big enough to feed an army. So, with a little tweaking, I've reduced the size of one of our favorites and it came out great.  We enjoy this butterscotch flavored bread pudding at room temperature and it makes an "over the top" late night snack.
5 slices of white sandwich bread (toasted in toaster)
1 cup heavy cream
1/4 cup brown sugar
1 tablespoon butter, melted
1 egg, beaten
1 teaspoon vanilla extract
1/4 cup butterscotch chips (good quality)

Toast the bread in the toaster and set aside to cool. When it is cool, tear in up into pieces about the size of a quarter.

In a medium size bowl, beat one egg; add the cream, sugar, vanilla and melted butter (whisk until well mixed).  Pour over the toasted and torn up bread and fold in the butterscotch chips. 

Let this mixture sit, at room temperature, for about 20 minutes (to soak up the liquid). At the end of 20 minutes, mix well.

Pour into a buttered 9" x 5" loaf pan and bake in preheated 350 oven for 30 to 35 minutes or until the bread pudding barely jiggles when you tap the pan.

Remove from oven and let it cool to room temperature before serving.

NOTE: After the bread has soaked up all of the cream-egg mixture, give it a good mix with a spatula (don't worry about the bread "breaking down").

NOTE: Use a good quality butterscotch chips. I've tried generic brands before and they were a little waxy tasting.

NOTE: Like any good bread pudding, it will be puffy when it first comes out of the oven, but then it will sort of "collapse" as it cools (this is normal).

BUTTERSCOTCH CHEESECAKE FOR TWO

0 komentar

This recipe makes the perfect amount for two perfect size desserts. It is smooth, creamy, rich and it has a serious butterscotch flavor. I will definitely be making this one often.

PREPARE PAN:  Preheat your oven to 325F. Line a mini-loaf pan (6" x 3" x2") with foil and spray with cooking spray. Leave the ends of the foil long enough that you can grab onto them. You will be using these "foil handles" to lift the chilled cheesecake out of the pan for easier serving.

CRUST
½ cup graham cracker crumbs
1 tablespoon brown sugar
1 tablespoons butter (melted)

Mix all and pat into the bottom of a prepared  mini-loaf pan.

CHEESECAKE
½ cup butterscotch chips
4 ounces of cream cheese (room temperature)
2 tablespoons dark brown sugar
1 teaspoon vanilla extract
½ teaspoon rum extract
1 egg (room temperature)

Melt the butterscotch chips and (using an electric mixer) beat them into the room temperature cream cheese until well mixed and smooth. Beat in the brown sugar and extracts until well mixed.
Beat in the room temperature egg.

Pour over crumb crust.  Set the mini-loaf pan inside of a larger baking dish (I use a 9" cake pan). Put boiling hot water in the BIGGER pan (water should come about half way up the side of the mini-loaf pan).

Place in preheated 325F oven and bake for 30 to 35 minutes (my oven took 35 minutes). You will know the cheesecake is done when you tap the loaf pan and the cheesecake just jiggles a little bit.

Remove from oven and let cook for about 20 minutes, then put it in the fridge for a few hours.

To serve, grab the ends of the foil  and lift it out of the loaf pan. Peel the foil back and cut in half.

BROWNIE FOR ONE = PAMPER YOURSELF

0 komentar

 They say that you are not supposed to reward yourself with food...OK, I get that. But every once in a while, I crave something deeply chocolate, deeply warm, gooey and rewarding. This recipe fills that bill perfectly and since it is only a single serving, there isn't a whole pan of calories calling your name the rest of the day.
.
I've been looking for a single serving brownie recipe like this for a long time because Hubby doesn't like brownies. I've tested lots of contenders with little satisfaction until now. The best part of this recipe, is that it is ready to eat in less than 5 minutes. The most "dangerous" part of this recipe is that it is ready to eat in less than 5 minutes...hahaha!!
.
MICROWAVE BROWNIE FOR ONE
.
¼ cup all purpose flour
¼ cup brown sugar
1/8 teaspoon baking powder
2 tablespoons cocoa powder
3 tablespoons milk
1 tablespoon butter (room temperature)
1 tablespoons pecans (optional)
2 tablespoon chocolate chips
.
In a small microwave safe bowl, mix everything together until smooth (mixture will be very thick). Cook in the microwave.
.
Now here comes the only tricky part of the recipe. Total cooking time in the microwave is one to two minutes depending on how powerful your microwave is. My microwave is a 1000 watt machine and it takes one minute 20 seconds. You will have to watch yours carefully the first time you cook this treat, so you don't over bake it (use the toothpick test for doneness the first time). LET THE BAKED BROWNIE SIT FOR ABOUT A MINUTE.
.
NOTE: I am embarrassed to say I know this recipe by heart now. Any flavored chocolate, peanut butter, white (etc.) chips will work well.
.
NOTE: The recipe doesn't say you have to, but I bake mine in a little ramekin that I spray with cooking spray.

CHOCOLATE CHEESECAKE FOR TWO

0 komentar

Chocolate cheesecake for two, how tempting is that? Actually, this was rich enough that Hubby and I split a piece (technically making it cheesecake for 4). Served with a dollop of sweetened whipped cream, this was the perfect ending to a romantic dinner.


Preheat your oven to 325F and line a mini loaf pan (6" x 3" x 2") with foil (leaving the ends long enough to grip on to) and spray with vegetable spray.

GRAHAM CRACKER CRUST
.
½ cup graham cracker crumbs
1 tablespoon sugar
1 tablespoon of melted butter
.
Mix well and pat firmly into prepared mini loaf pan, set aside.
.
FILLING
.
½ cup semi-sweet chocolate chips (see note)
4 ounces cream cheese (room temperature)
2 tablespoons white sugar
1 egg room temperature (slightly beaten)
1 teaspoon flour
½ teaspoon vanilla extract
.
Melt chocolate chips and beat them into the softened cream cheese; add the vanilla and sugar. Whisk in beaten egg and flour until smooth (don't over mix). Pour over the crumb crust.
.
Place the mini loaf pan inside of an 8" or 9" cake pan and add hot water to the bigger pan until it comes half way up the side of the smaller pan. Bake 30 minutes or until set.
.
Cool about 15 minutes, then put in fridge and chill for at least 3 hours (even better on day 2). To serve, grab edges of foil, and lift the cheesecake out of the pan. Fold foil back and cut cheesecake into pieces; s
erve with sweetened whipped cream.
.
NOTE: Your chocolate cheesecake is only going to be as tasty as the chocolate that you use. I used Ghirardelli chocolate chips and they were excellent.
.
NOTE: After baking for 30 minutes, gently tap the side of the smaller pan with a spoon. You should see just a little jiggle in the batter, but not much.

WHITE CHOCOLATE & RASPBERRY CHEESECAKE FOR TWO

0 komentar

If you are looking for a special dessert for two, this is it. This recipe has several steps, but they are all very easy and the final product is totally delicious. What a way to top off a romantic meal!!

Preheat your oven to 325 and line a mini-loaf pan (6" x 3" x 2") with foil. The foil will help you lift the baked cheesecake out of the pan after it is chilled, so make the foil ends long enough to grab on to. Spray with vegetable spray and set aside.

Make the raspberry sauce: In a sauce pan, heat up 1 cup of raspberries (I used frozen) and ¼ cup of white sugar. Bring to a simmer and mash the berries as they cook. When berries are all soft, thicken with a slurry of 1 tablespoon corn starch mixed with 1 tablespoon water. Stir until berries are nice a thick. Press through fine mesh strainer. Set aside.

Crust: Mix ½ cup graham cracker crumbs, 1 tablespoon white sugar and 1 tablespoon melted butter. When thoroughly mixed together, press into the bottom of the foil lined mini-loaf pan. Set aside.

Filling: Melt ¼ cup of white chocolate chips with 1 tablespoon cream and set aside. In a bowl, with an electric mixer, cream 3 ounces of room temperature cream cheese and 2 tablespoons sugar. When thoroughly creamed, add 1 egg white, ½ teaspoon vanilla and 2 teaspoons all purpose flour (don't over beat). Stir in melted white chocolate chips.

Pour half of the batter onto the crumb crust and top with half of the berry mixture. Top with the second half of the batter then decorate the top with the rest of the berry mixture. *see note

Water bath: Place the mini-loaf pan (with cheesecake in it) inside of a larger pan (I used a 9" cake pan) and pour very hot water into the larger pan, making sure that the hot water comes half way up on the sides of the mini-loaf pan.

Bake in a 325 oven for 28 to 33 minutes (my oven takes 33 minutes). The cheesecake is done when you gently tap the side of the pan and the cheesecake sort of jiggles (kind of like jello).

Cool for 30 minutes in the pan, then chill for at least 3 hours. To serve, lift the cheesecake out of the mini-loaf pan (using the foil "handles") then cut it into two pieces.

NOTE: You don't have to strain the seeds out of the raspberries if you don't want to. To decorate the top of the cheesecake, I spooned small amounts of the berrys in a random pattern, then ran the tip of a toothpick through the berries to make a design.

Popular Posts

 
  • For Secret Recipe © 2012 | Designed by Rumah Dijual, in collaboration with Web Hosting , Blogger Templates and WP Themes